Let’s add interactivity. Our world is animated, but these animations are predetermined. We can move our disembodied head around inside of it, with a full 360° view, but moving your head around isn’t all that much interactivity.
So let’s move beyond predetermined animations and make our world react in real-time to events, as well as teach this world to react to us as we interact with it. To do this, we need to create behaviors for our world: our world has to act, react, and interact with its various elements, as well as with the player moving and acting inside of it. These behaviors are called Scripts.
Scripts
The use of the word Script should be no surprise to you. Unity uses language inherited from cinema to describe its universe: there are Scenes with a Camera on a Stage that shows us objects made visible by Lights. So it should come as no surprise to learn that actors in this world would have Scripts attached to them that tell them how to behave. In fact, everything that you see in the heirarchy — yes, everything! — can have a specialized Script attached to it. For example, a Camera can have a script telling it to follow a player’s gaze as they move their head around: the XR Rig is an example of just such a script. A Light can have a script telling it to change the angle of the sunlight throughout the day. And a Game Object can have a Script — even multiple scripts — telling it how to behave based on how we interact with the game.
Programming
These behaviors, these Scripts are also known under another name that unfortunately scares people: these behaviors can also be called “programs”. Ah, programming — that vast infamous universe, always just outside of your reach. Let’s be clear: programming is cool, programming is even fun. But let’s also be honest: people are often scared of it — often rightfully so, because many programming languages are needlessly obtuse. If you try to follow a programming tutorial on the Internet or some random YouTube channel, you often find yourself quickly sinking into a verbose soup of overly complicated terminology. Hopefully not here. Let’s see if we can keep it simple.
So deep breaths. Yes, we are going to enter the world of the scary monster known as programming. And yes we can definitely slay this monster.
Visual Scripts | C# Scripts
There are two principle types of “scripts” used in Unity: Visual Scripts and C# Scripts. As its name suggests, Visual Scripts are scripts that you layout visually, by connecting up visual diagrams of blocks, otherwise known as nodes or units. These visual Script Nodes are fairly new to Unity, and were added by default starting with Unity 2021.1. These scripts are fairly easy to learn once you know the basics of how they work.
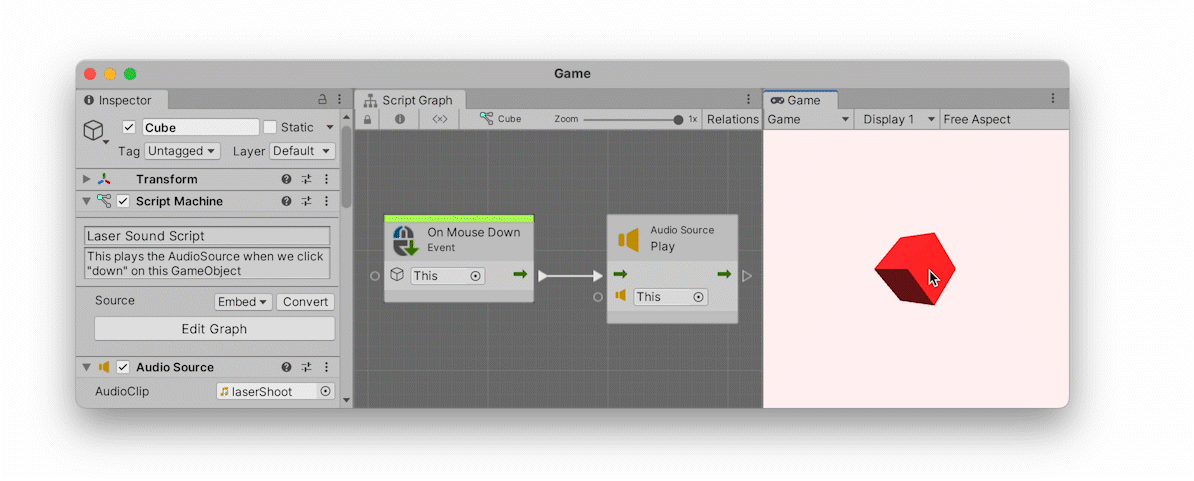
The above “visual” script reacts to mouse clicks on a specific Game Object and plays an AudioSource, also placed on that GameObject. If you look inside the Inspector of the Cube, you will see a LaserShoot sound attached to its AudioSource. So when I click on the cube, the script attached to that cube detects this mouse-just-clicked-on-me Event (OnMouseDown) and subsequently plays the LaserShoot sound. And finally, when I click outside of the cube, nothing happens because there are no scripts attached to the background.
By following the diagram and its arrow we see a very simple cause and effect chain of consequence: when (On) the Mouse clicks Down on This object → Play the sound (AudioSource). As you can see in the illustration, one of the advantages of visual scripts is that they animate this behavior inside the Unity Editor while the game plays, allowing you to better understand how the script reacts to the mouse.
The other, more traditional method for creating behavior in Unity is by writing out C# scripts (pronounced “see sharp”) using code. These scripts are harder to learn, and are the principle type of scripts you will find on the Internet — including a whole plethora of overly complicated scripts that will needlessly confuse beginners.
Here is the exact same behavior as before, only written out using C# code:
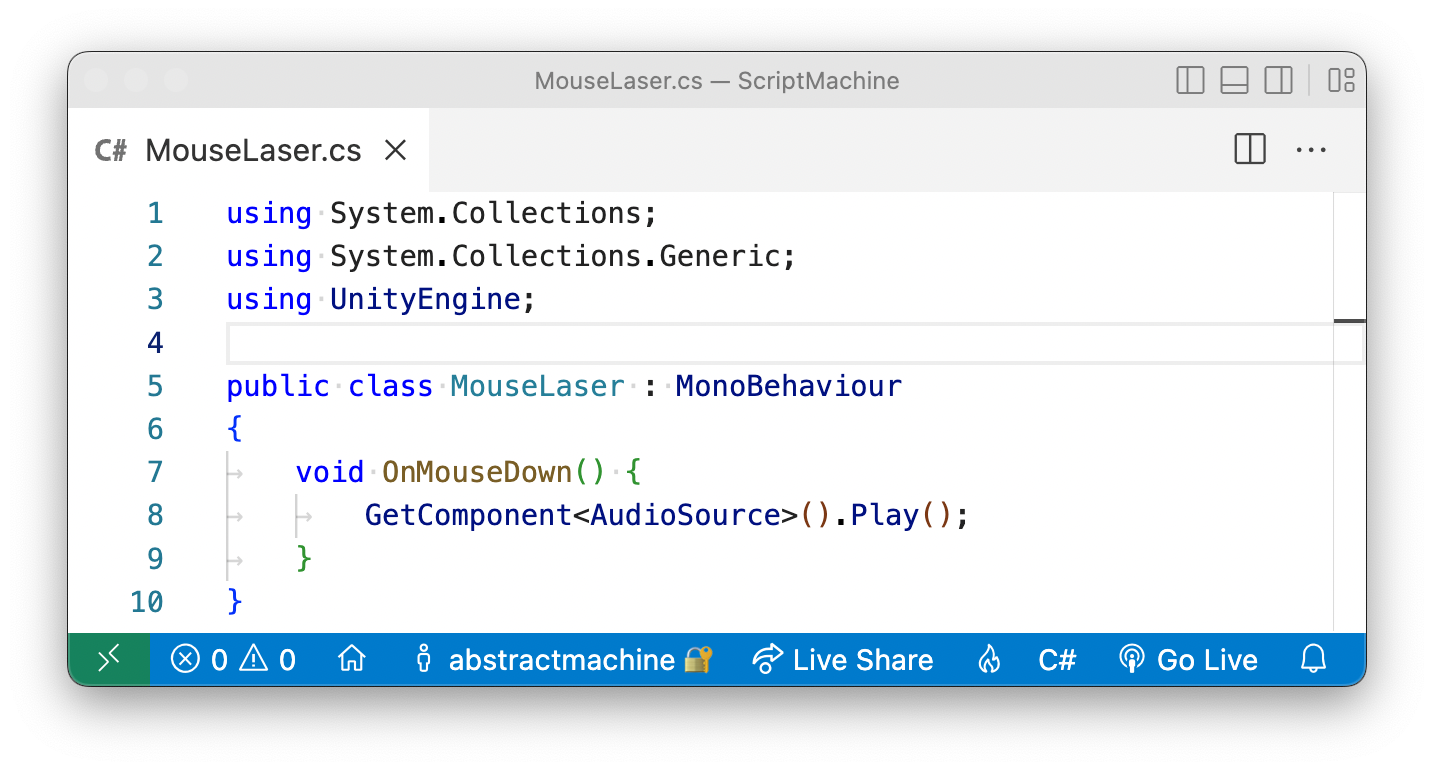
As you can see from the above illustration, this second example written in C# is a lot more complex, with all sorts of complicated terms such as using System.Collections; or public class MouseLaser : MonoBehavior or void. There are a gazillion brackets, periods, and semicolons. And what the #@%$ is the meaning here of the word void!?
Indeed, this is the difficulty of learning C# when you are a beginner: you will have to get used to a lot of terminology. That said, in the above example, Unity actually wrote most of the code for me automatically so it wasn’t really all that hard. I only wrote the actual behavior part of the script, which is the middle part:
void OnMouseDown()
{
    GetComponent<AudioSource>().Play();
}
Even if you don’t know how to read code, this C# Script should still be somewhat readable to you: when the player clicks down on this object, get that object’s AudioSource component (cf. Inspector) and play the sound. For some people (myself included), C# scripts are actually easier to read, and can often require less effort. There are trade-offs for either approach, and we will avoid wading into the endless (and pointless) debate here over which is “better”. Each approach has its advantage.
We will not be using C# scripts for this tutorial. There are plenty of C# tutorials on the Internet. Instead we will be using the easier-to-learn method of “visual scripting”, in order to reduce complexity down to its bare minimum. But once you have mastered the basics of this visual approach, you will have also learned a lot of the fundamentals that will help you to learn C# Scripts.
Visual Programming
If you have experimented with interactive software, this Visual Script concept might seem familiar to you. There is a long history of interactive and real-time performance tools that use a similar node-based programming approach; cf. TouchDesigner, vvvv, Quartz Composer, Unreal, Max or PureData. There are a lot of visual-scripting pedagogical tools such as Scratch that can also be used as game engines — these are often specifically prefered by beginners precisely because they do not require learning how to code: Construct, GB Studio, and Godot are some other popular tools used to make games.
It also seems like every time I search for VR tools, a gazillion new visual-scripting solutions pop up: one recent example is Patches. Notch is yet another.
3D modelling software such as Blender has been progressively adding Nodes to its various tools (cf. Blender Geometry and Material Nodes), and 3D CAD software such as Rhino has long used nodes via the Grasshopper plugin for designing parametric architecture. There are even web-based development tools such as Nodes.io for visually scripting JavaScript projects. And within Unity itself, there are now several node-based tools similar to this Visual Script node system: cf. Shader Graph, Visual Effect Graph, and Animator.
New Project
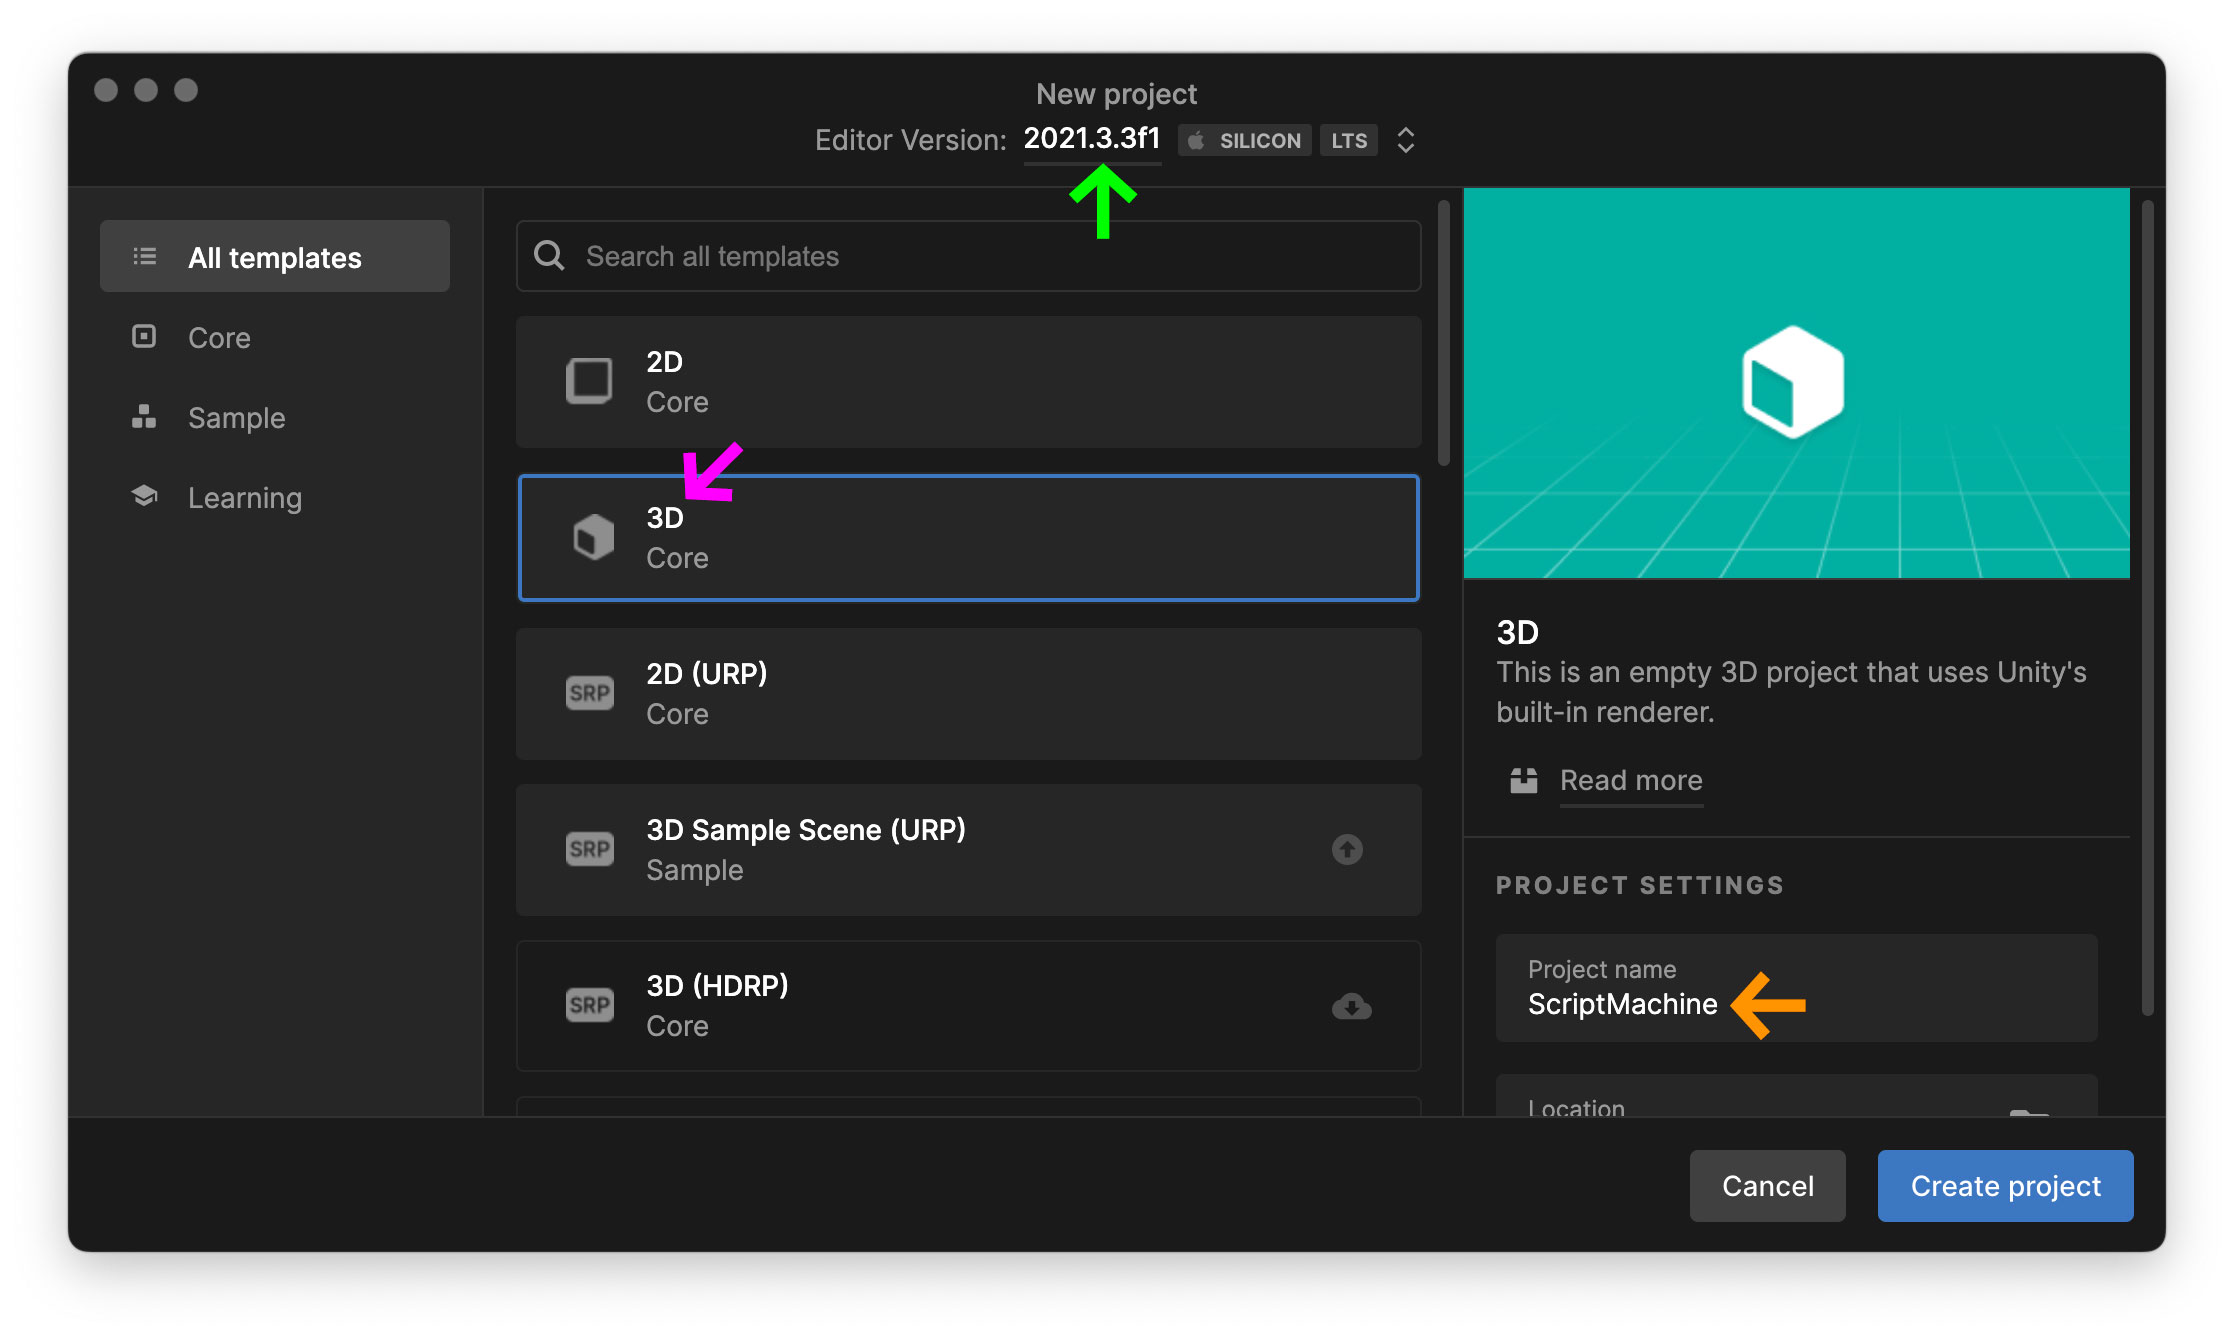
Ok. Let’s make a Visual Script. We’ll start with a new Core 3DScriptMachineUnity 2021.3Apple Silicon. I will purposefully keep this tutorial fairly general, so hopefully these instructions will work over several versions without need for an update. Unfortunately Unity is always a moving target for tutorials. Whatever the case, you will need at least Unity 2021.1 (or later) for Visual Scripts to be included by default.
Now create a standard Cube in your scene via Hierarchy → + 3D Object → Cube. Note that I’ve rotated it 45°XYCameraZ axis by changing its Z value to -3.
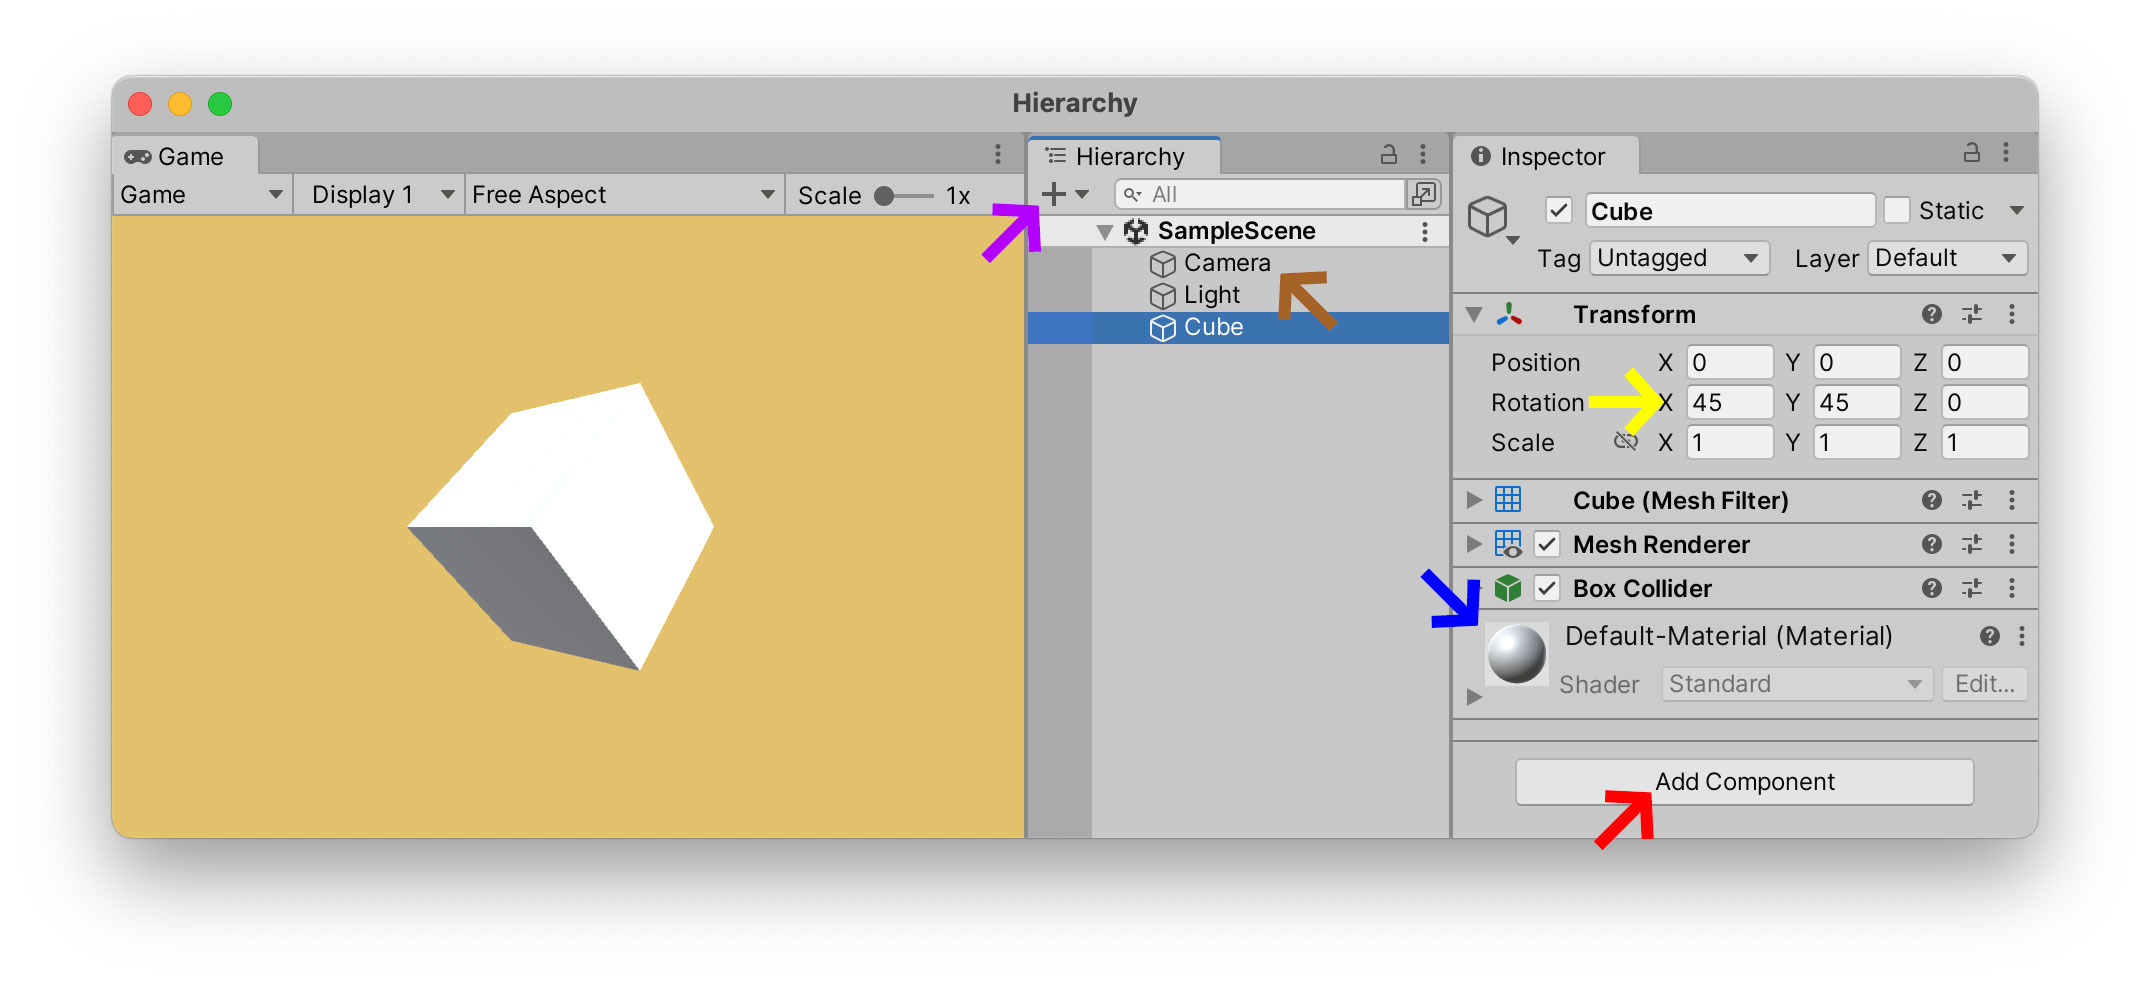
For now, I am leaving the Cube’s Default-Material
Embeded Script
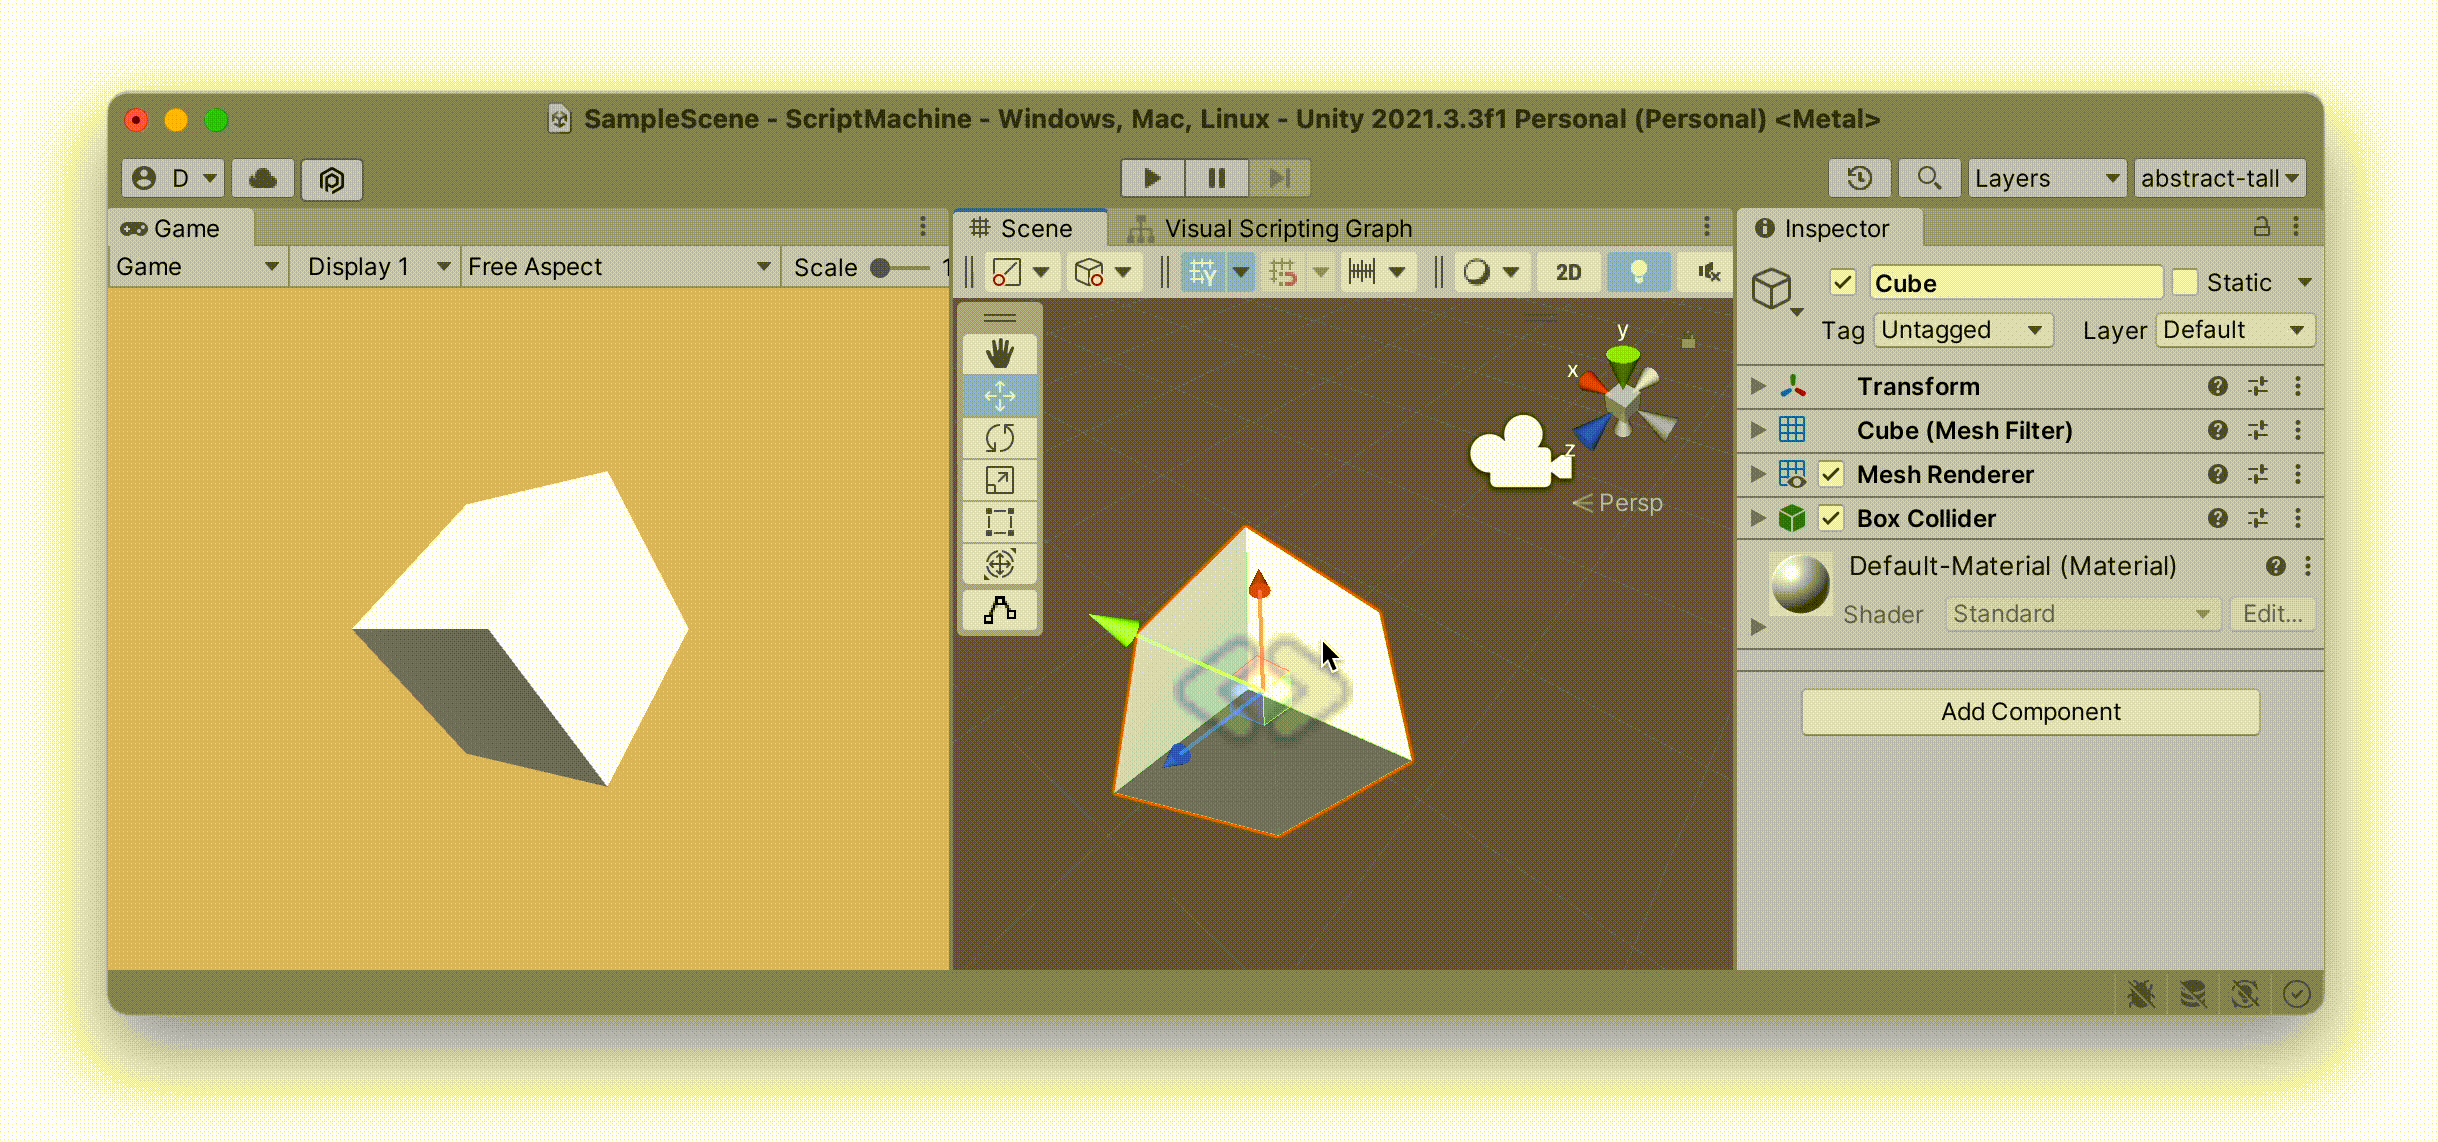
If we press the Play button now, our Cube won’t do anything. Let’s change that. Let’s add a Script and see how quickly we can get it to do something. Select the Cube. Press Add ComponentVisual Scripts → Script Machine component inside of that list. Select it in order to add it to your Cube.
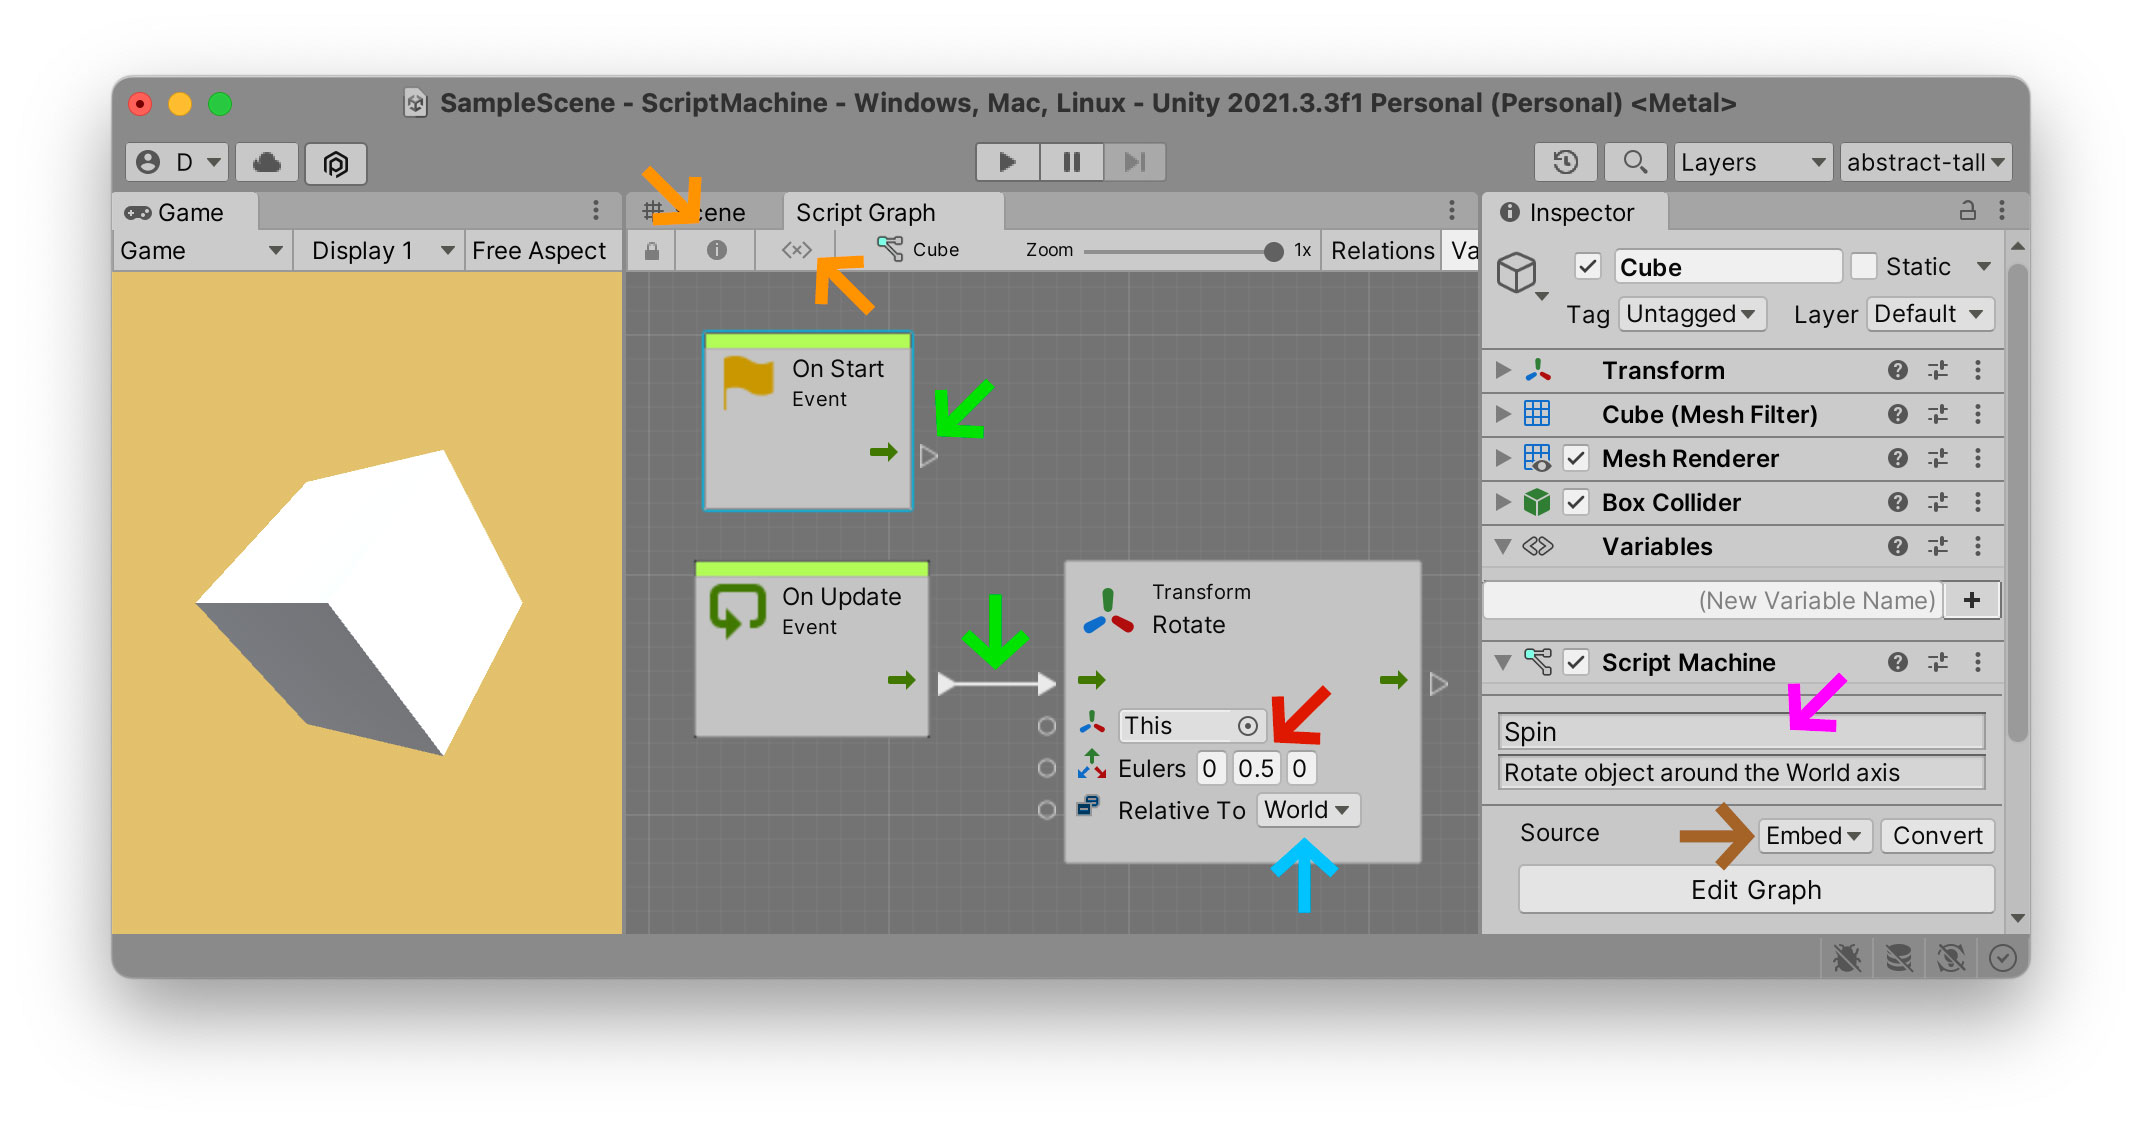
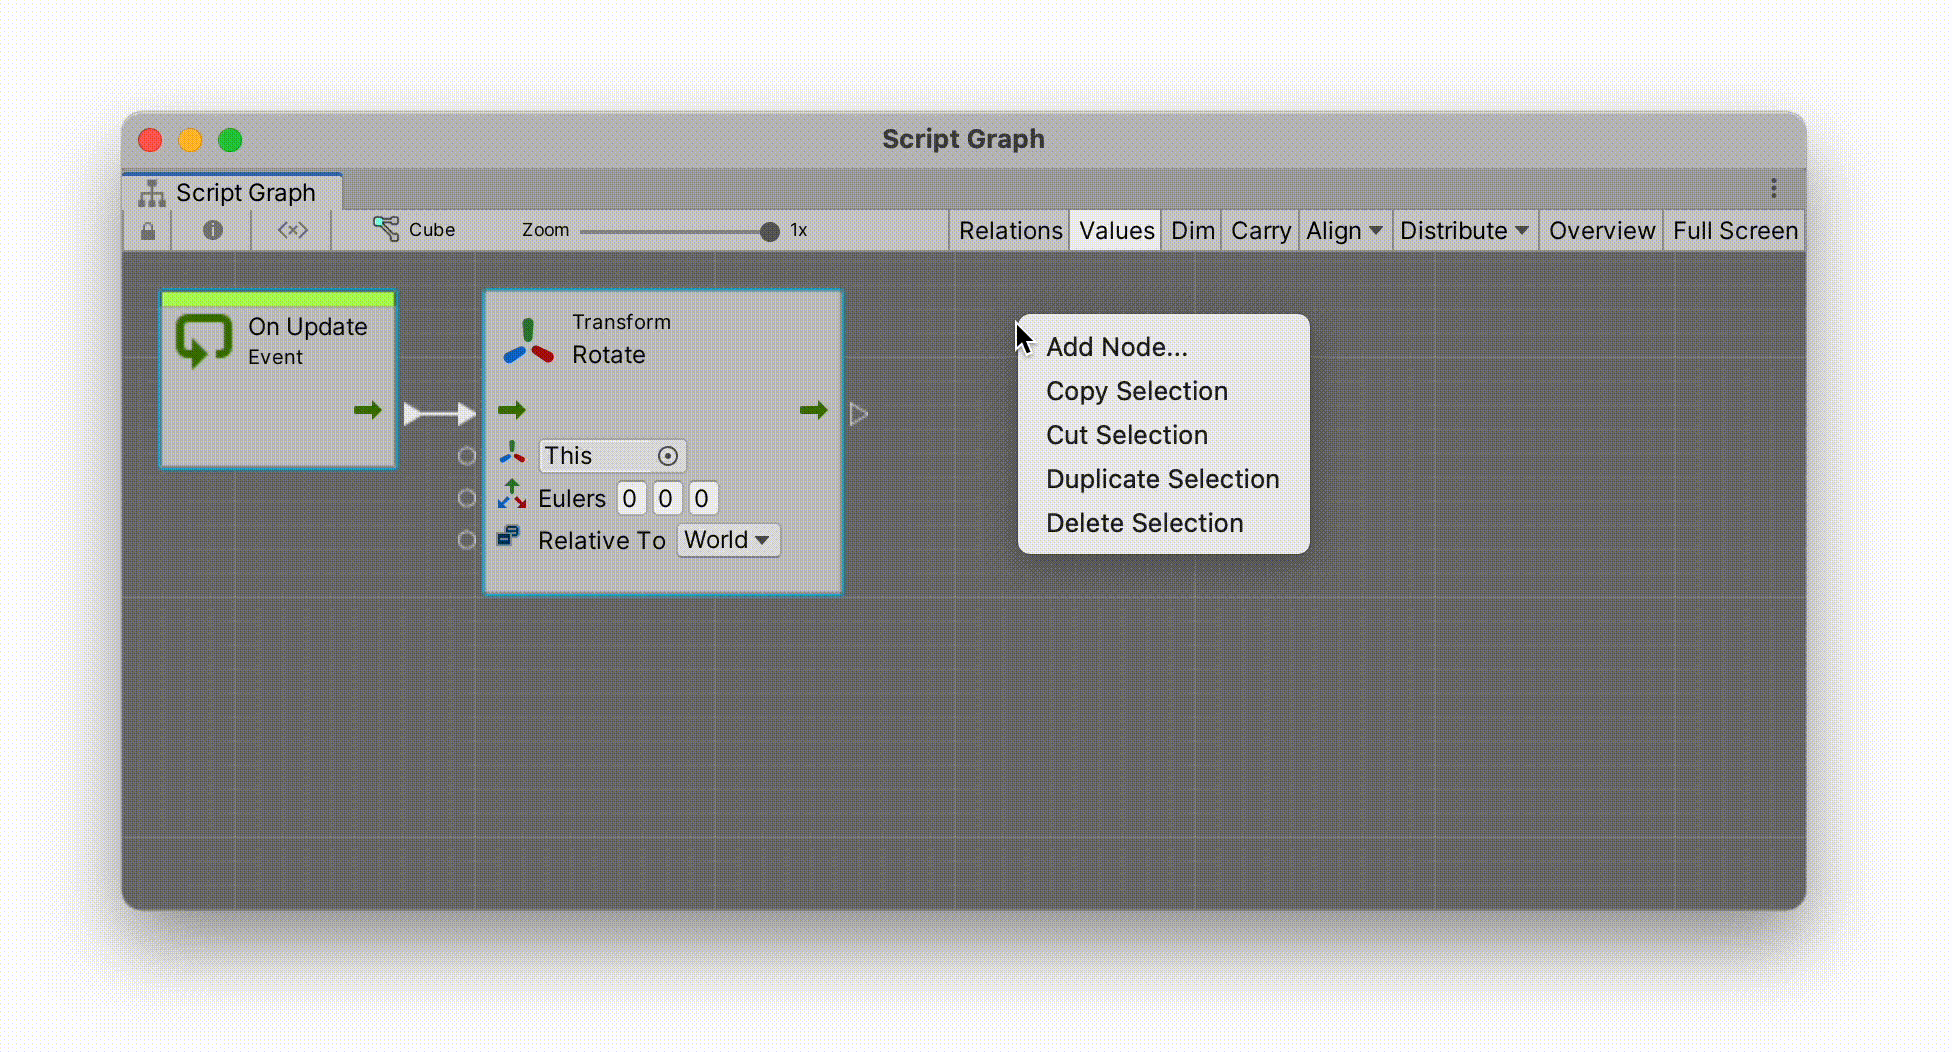
This Script Machine is not the script itself, but instead the Machine that executes the Script’s instructions. Think of the Script Machine as the brain: it still needs a Script to tell it how to think and what to do. The fastest way to add an actual Script to this Script Machine is to select the Source: Embed option. An Embedded script means that a script will be applied directly to our object, and in fact, specifically to this object alone. Click on Edit Graph, which should open up your first Script Graph with two Script Nodes already added for you by default: On Update and On Start. This Script Graph is the visual diagram of how your object will behave.
As you can see from the above illustration, with EmbededGame Objects to do all sorts of things in Unity. You can even drag the components you wish to control directly into the window and Unity will give you a list of all the actions, options, and values that can be manipulated on that component. Here I have dragged the Transform component, and Unity gave me the list of all the various ways in which I can Rotate(...) my Cube object. I opted to Rotate using the EulersXYZRelative ToWorldSelf
Note that in order to keep my interface clean, I hid the VariablesInspectorScript Graphnamedescription
Flow
As you can see in the above illustration, there is a connection flowing outOn Update and into the green arrow inputTransform Rotate node. There is also a similar green arrow ready to flow outOn Start node, but nothing is connected to it. In fact you can entirely remove this node if you are not going to connect its flow into anything.
Each time you see a green arrow like this, it represents the “flow” of the Script Graph. There can be many different flows. These “flows” are the actual moments when something gets done. “Flow” means “do something now” or “do something when”, depending on the context. In other nodal programming environments like Max or PureData this flow arrow is called a “bang”, i.e. “do something now” is triggered as if someone just pulled the trigger of a gun. If you press the Play button, Unity will (approximately) animate for you the constant nature of this flow: the On Update will flow out at approximately 60 frames per second, whereas the On Start flow will only activate once, when the Script Machine of this object appears in the Scene for the very first time, i.e. at the “starting moment” whenever it is that this object comes-into-being.
Event
You might have noticed that our two default nodes are called Events. These events can be “when the game starts”, “when someone clicks on this object”, “when the player pushes down on a button or a key”, “when this object collides with another object”, and so on. One of the major differences between Unity and creative coding environments such as processing is that in Unity you will often develop your game by reacting to events, as opposed to generating them. In Processing you build your visual world up from scratch, starting with the most basic shapes, and then multiply those shapes by a thousand, ten thousand, or whatever evolutive process you want to explore. In Unity, you tend to build your world, and then wait for events that you can then react to.
Let’s add two events to our Cube in order to illustrate this concept.
In the above example I have selected the Cube’s Script Graph, right-clicked on the background to open what is called the Fuzzy Finder and selected from this list the On Mouse Down and On Mouse Up events. Each of these nodes will send out an impulse from their green outputs when the player presses down and presses up on our Cube.
Let’s change materials to make this interaction visible.
Create a new folder named MaterialsProject folder. Note the capital M and the plural s and the end of this folder. This is a Unity naming convention that will help you keep your Project folder organised.
Inside your MaterialscreateMaterials with three different colors. I’ve called my colors HotColdDefaultwhatever colorCube with our mouse. We’ll use the third color (Default
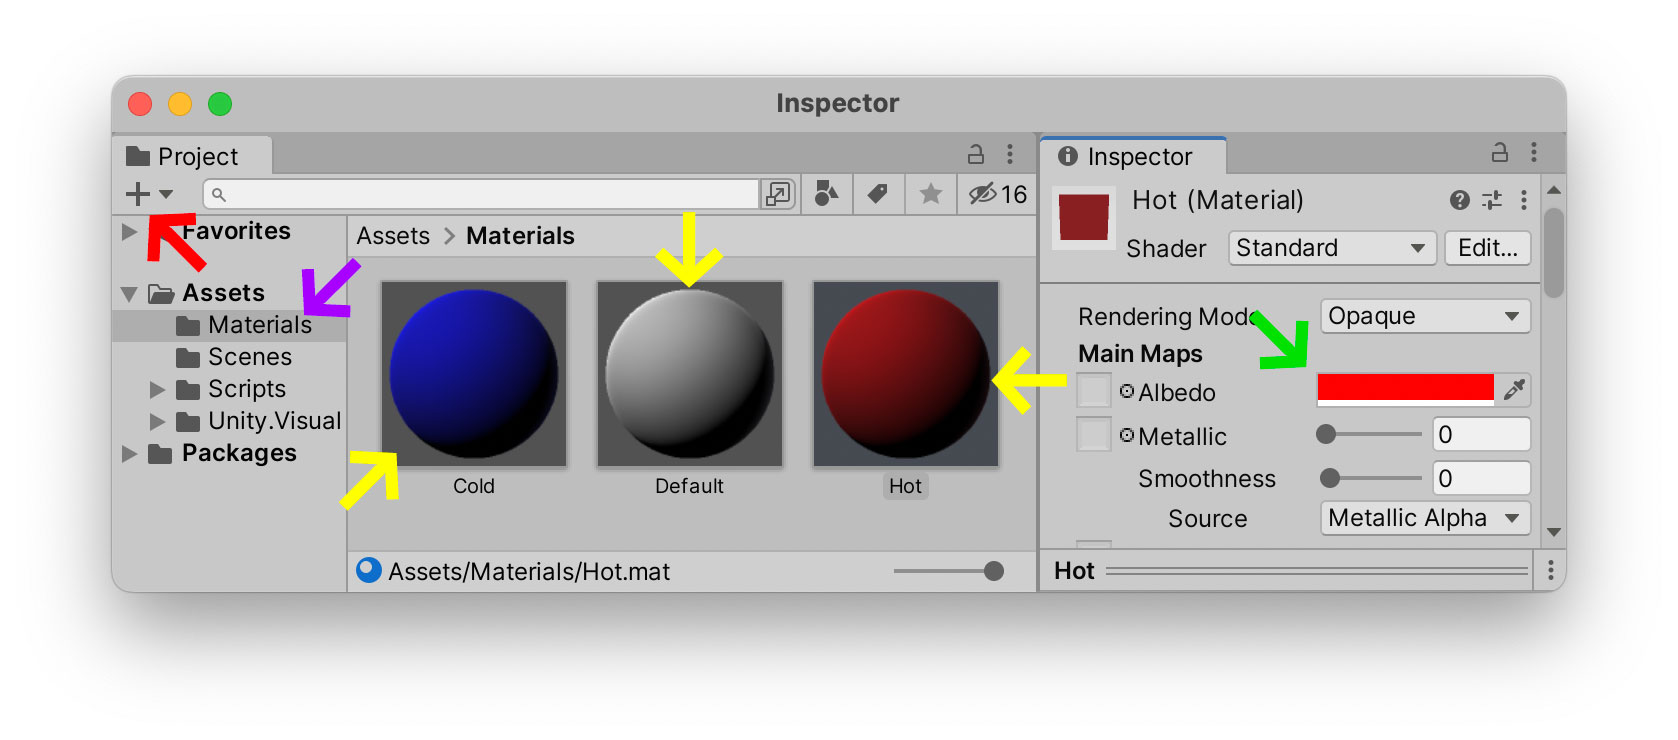
As you can see in the example below, the component inside of our Cube that we want to change is called the Mesh Renderer. Currently the Cube’s Mesh Renderer has the Default-Material listed as its first and only Material. This value can change while the scene plays. We can modify it via our Script Graph whenever a mouse Event takes place interactively.
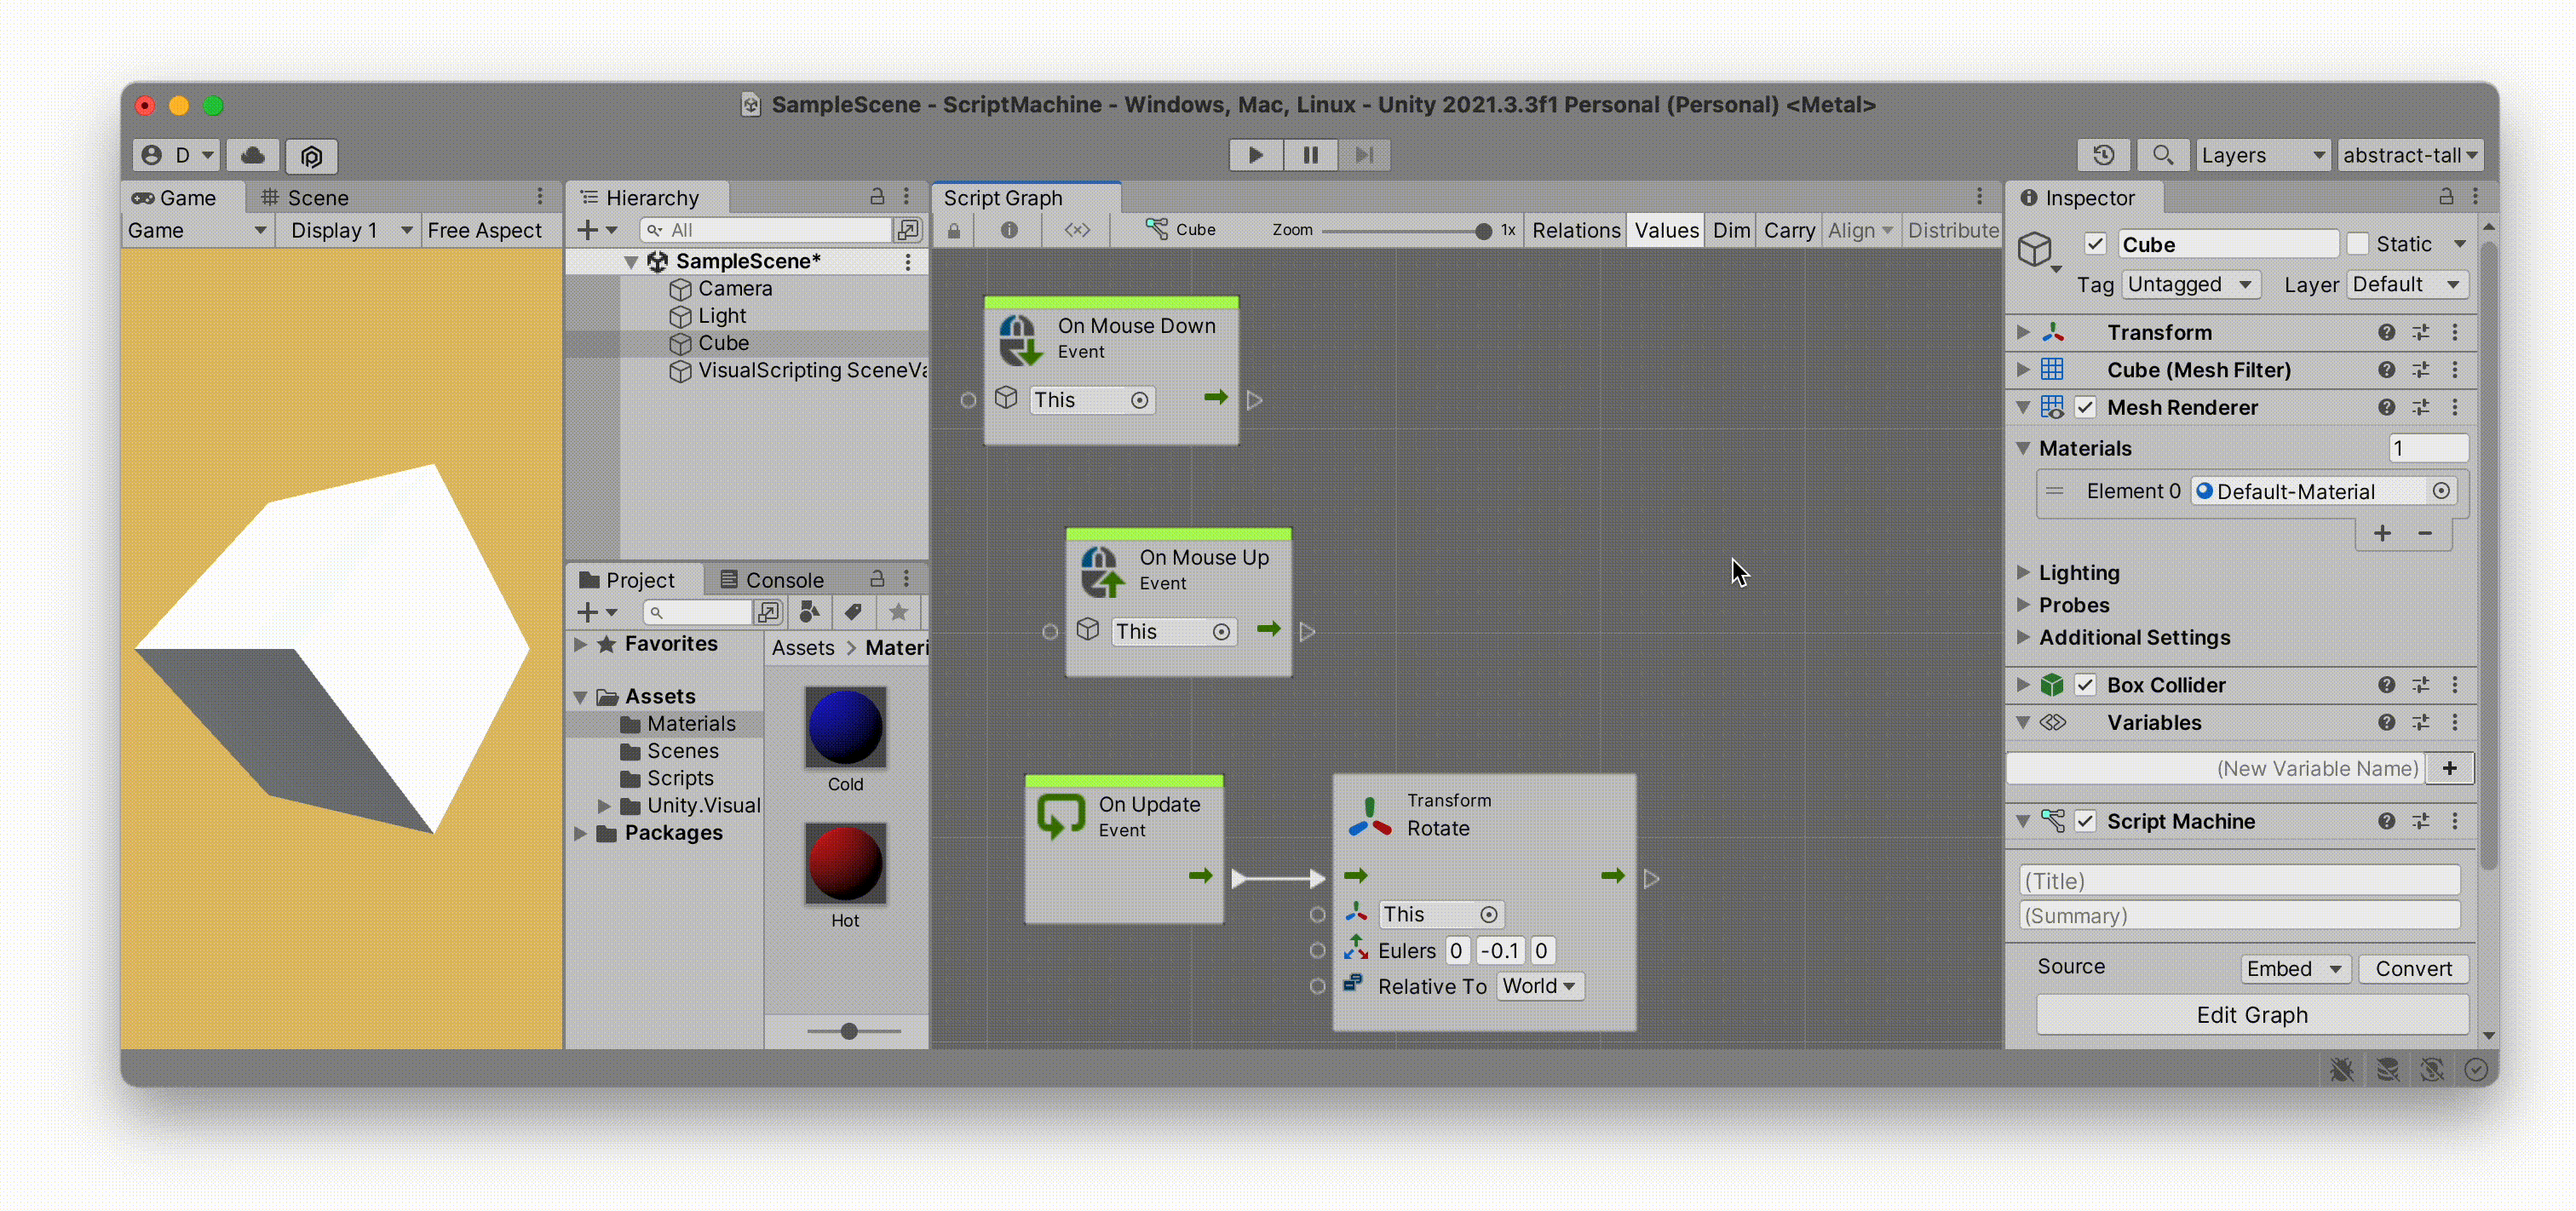
As we did before with the Transform component, this time drag the Mesh Renderer from your Cube’s Inspector directly into your Script Graph. You will be given a list of possible choices. The one you are looking for is Set Material. Duplicate this Material change node and connect each one up to their respective On Mouse Down and On Mouse Up events. Each of these nodes should temporarily turn orange, as we have not told it yet which Material to use. So drag your new Materials from your Project window onto each of the nodes: in my example I have set the Material to Hot when clicking down on the mouse, and to Cold when clicking up.
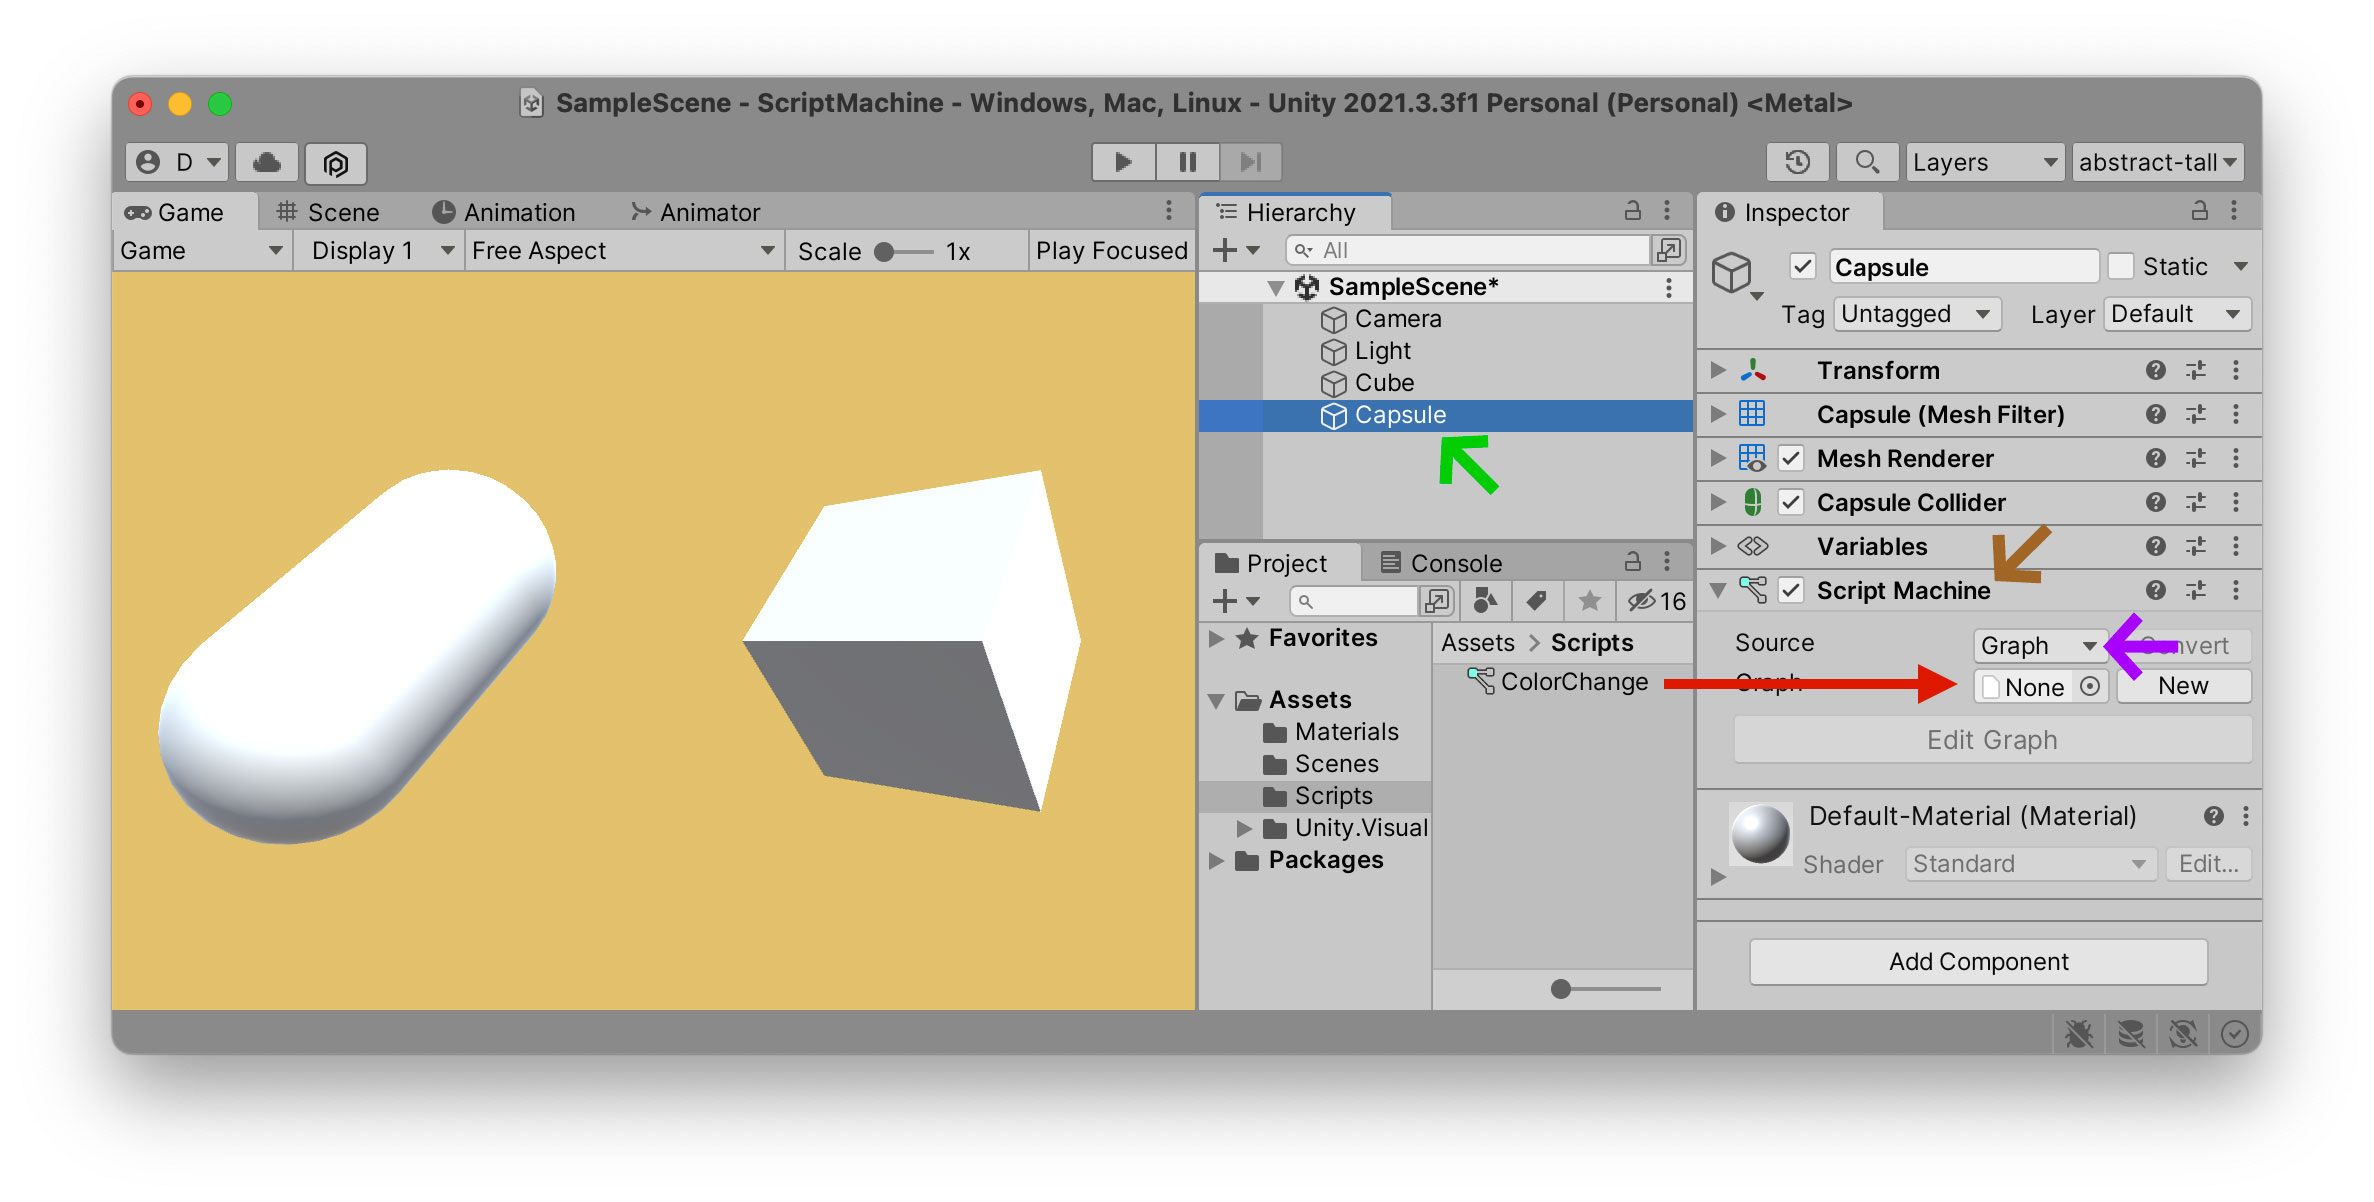
Embeded vs Graph
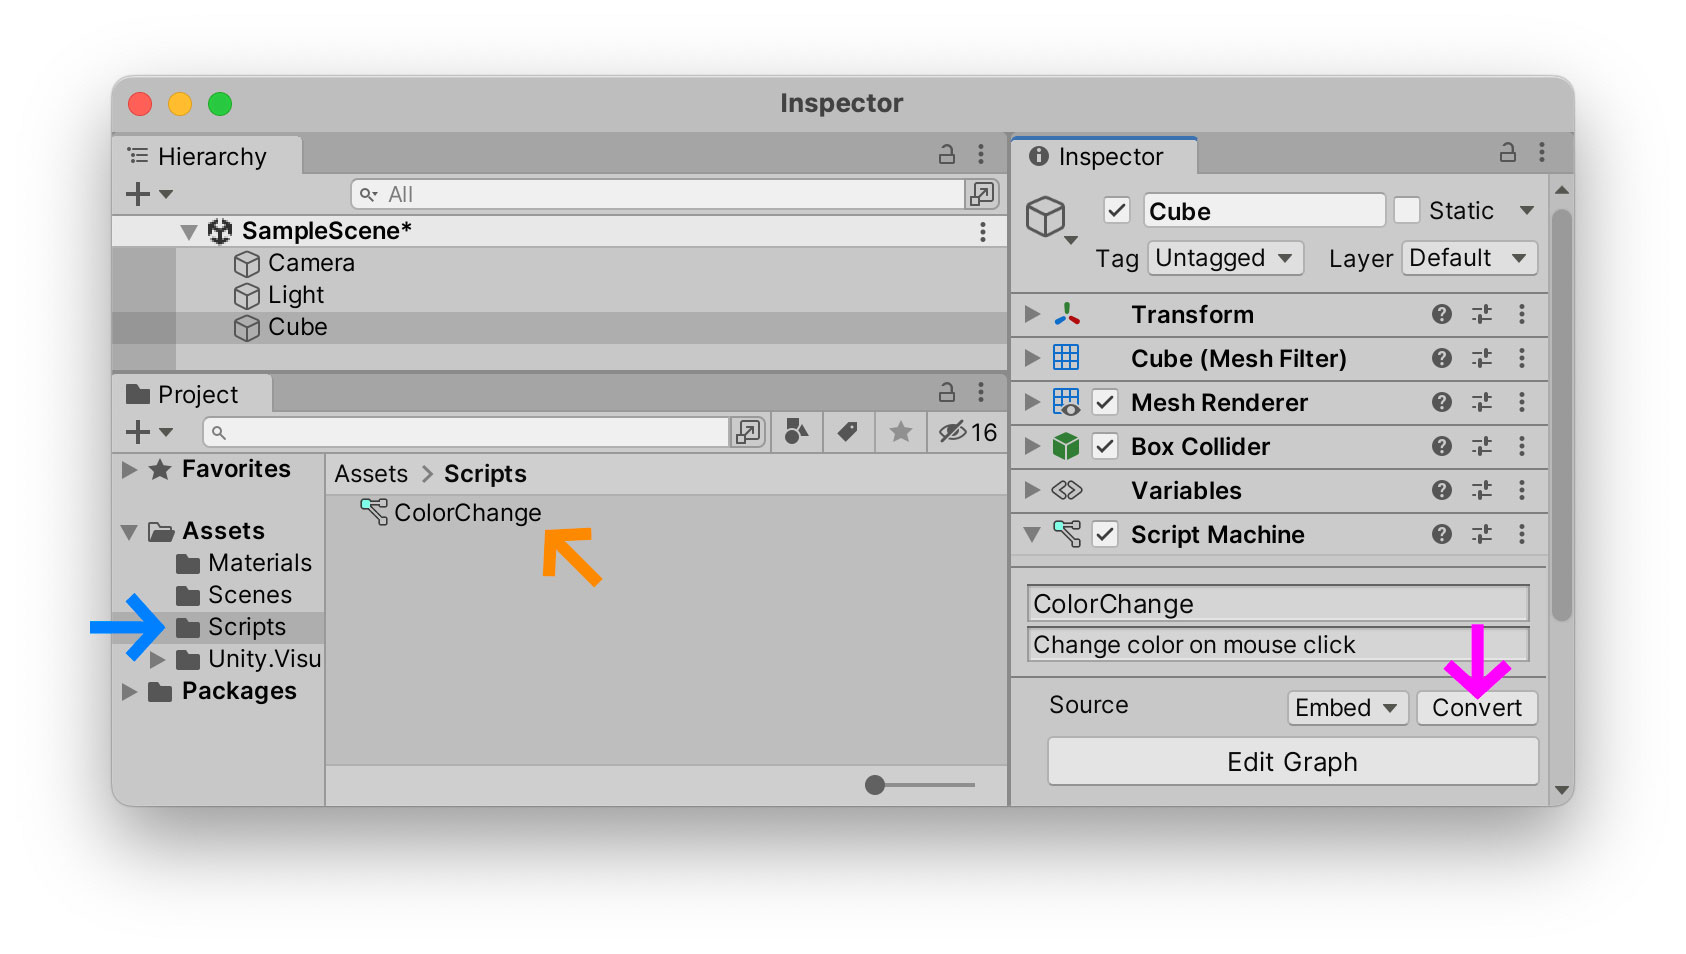
Embedded Script Graphs are good for quickly prototyping ideas but they are fragile things: they only exist on this single Game Object and therefore if you delete this Cube from the scene, your Script Graph will be deleted with it. We should really save it’s graph as an independent entity in the Project window.
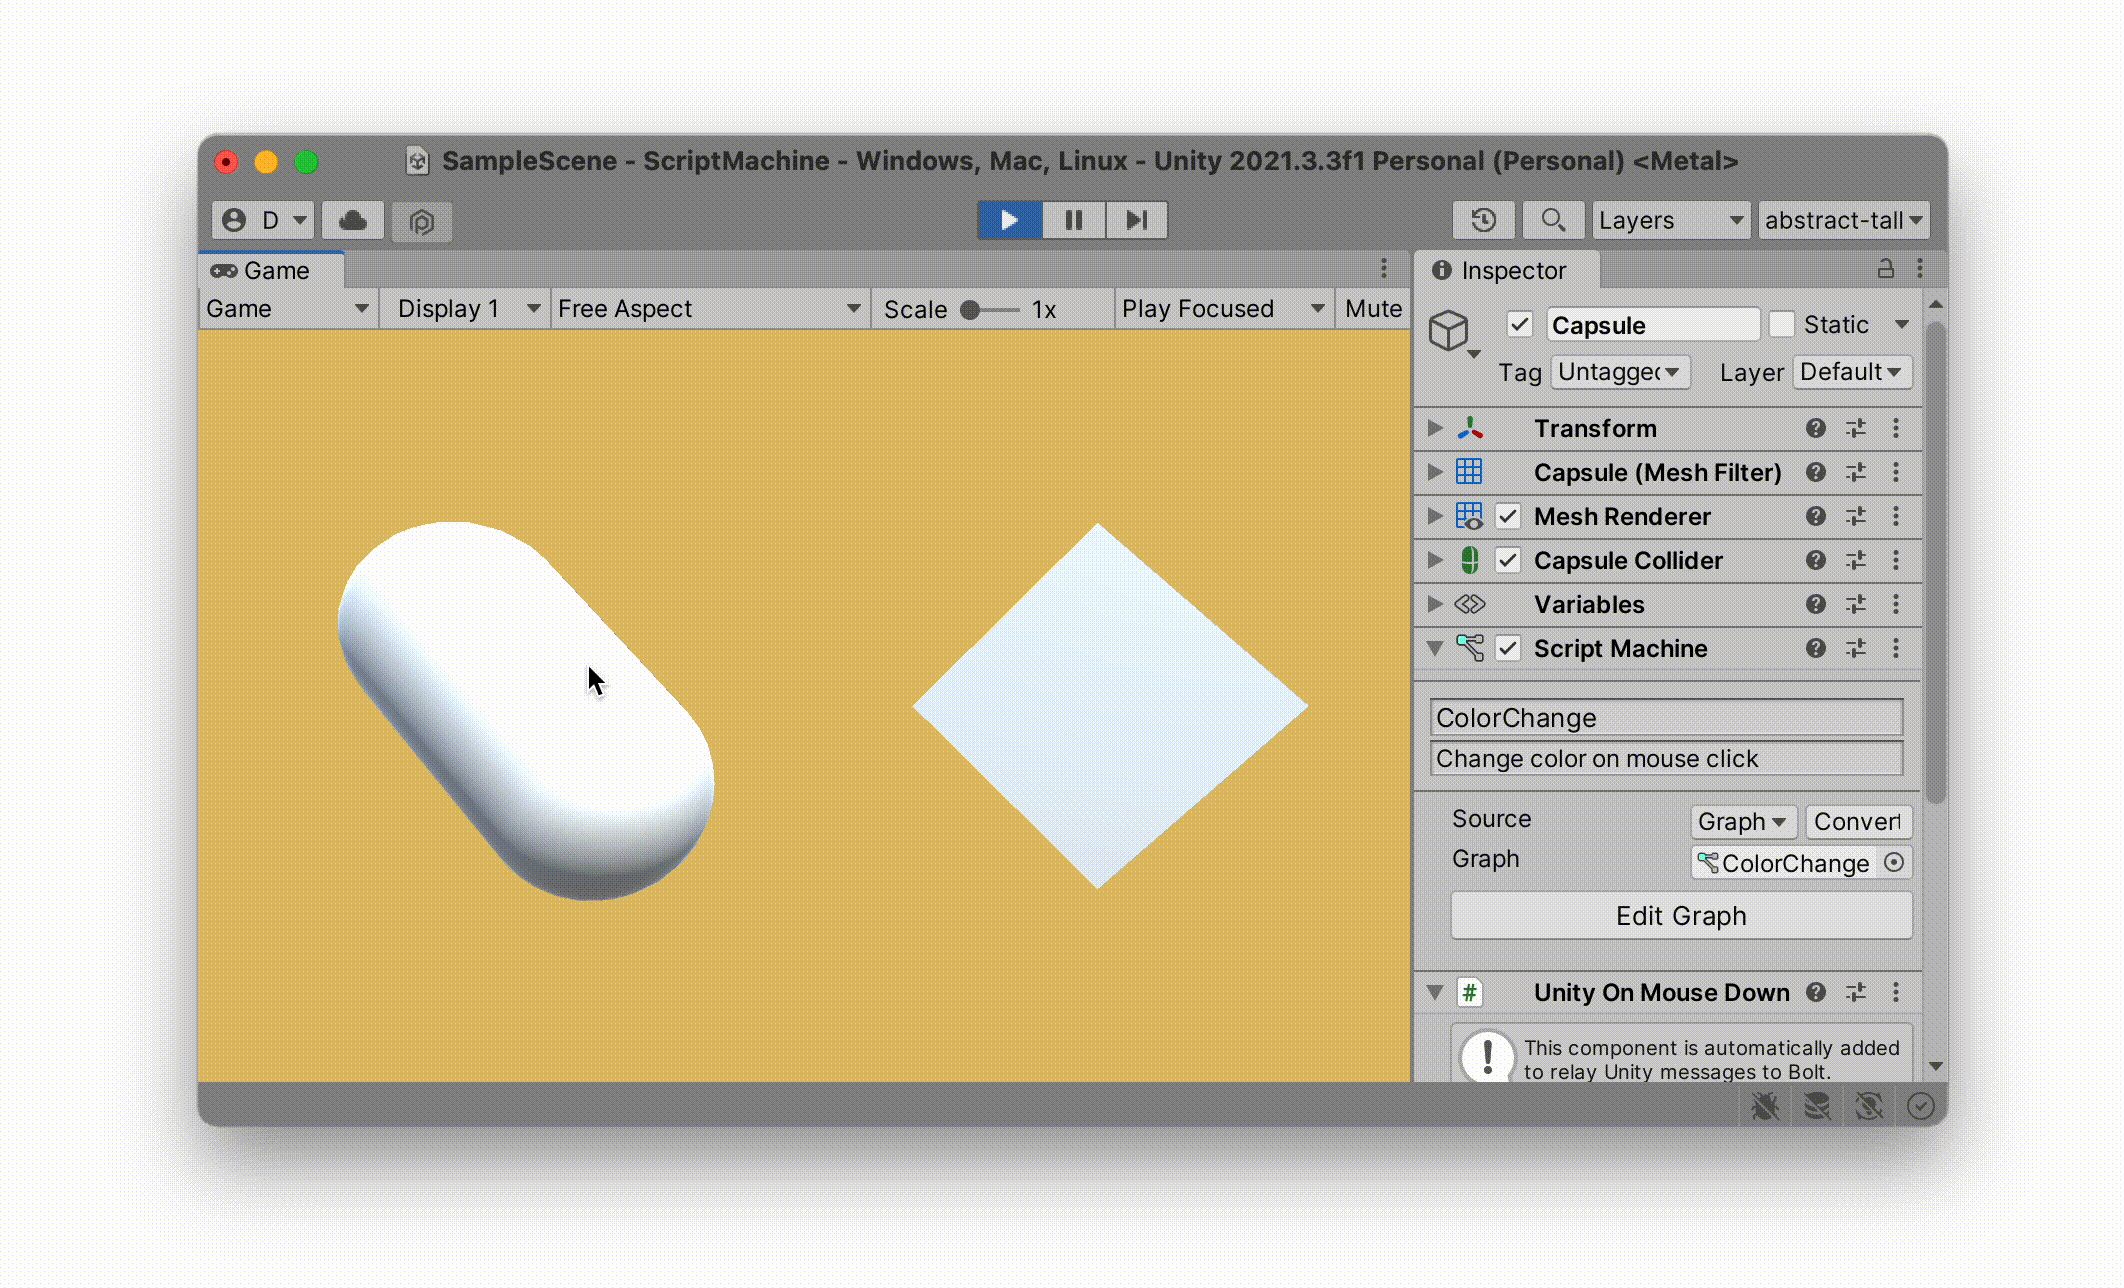
To do this, select your Cube’s Script Machine component in the Inspector, and press the ConvertScript Graph that you can independently save into your Project folder. I have created a ScriptsColorChange
Now that my script is independent from my Cube, I can create a second Game Object in my Scene Hierarchy and use this same Script Graph on it as well. Here I have created a new CapsuleHierarchy and added a Script MachinedragColorChangeSourceEmbeded, but is now listed as Graph
Now when I press Play the script applies to both Game Objects, but independently, thanks to the This keyword which allows each object to understand that the Material changes only apply to the object iteself, independently of the other.