Let’s explore animations more complex than rotating cubes. In fact, we’ll be looking at one of the most potentially complex examples of Animation and Animation Controller pairings, namely the case of the Humanoid.
You might have noticed that there is a new generation of 3D human characters that are appearing in video games and immersive narratives. These characters have more realistic body types, richer and more dynamic skin that reacts better to light and shadows, and they even have somewhat decent facial expressions. This last aspect — facial expressions — still needs more technical advances and better tools, but we are inching closer and closer to pseudo-cinematic experiences within real-time programmable interactive game engines.
One of the reasons for the sudden rise in quality characters, is an improvement in the tools used to build virtual humans. It is very time consuming to create people vertex by vertex in 3D modelling tools (cf. Blender, below), and then attach their 3D model skin to a rig of bones so that they can be animated in Unity or Unreal. Not only did we just use a lot of jargon in the previous phrase, but we also described several laborious processes. So to quicken this workflow, many humanoid generator tools have been developed.
Character Creator & iClone
The most popular tool, and also the most expensive, is Character Creator which, as it’s name implies, allows you to create a fully rigged character just by moving around sliders (taller, shorter, older, younger, eye color, arm length, etc, ad nauseum). The same company also has an animation tool (that also does other stuff) called iClone, and that too costs a lot — even with student discounts. So be careful.
MetaHuman
Another impressive tool, but that can only be used (legally) with Unreal Engine is Meta Human. Epic has spent a lot of time, money, and communications on this tool. It is one of the many reasons people are very excited about the Unreal game engine.
Ziva + Meta = Unity
Unity has also made a lot of acquisitions recently, notably purchasing Weta Digital last year, as well as Ziva Dynamics. At first glance it might appear that this is just a reactive move to Epic’s advances, but many of these purchases signal that Unity is also looking bigger picture at the overall landscape of how characters, materials, and environments should interact with their tools. Weta and Ziva go far beyond fancy-looking humanoids and lead us into the world of simulation:
Long story short, Unreal and Unity are in a massive battle right now, and this translates into a lot of development tools focused on sophisticated humanoids with more expressive animations than we had in the previous 30 years or so of human faces and bodies in videogames. The following video, for example, is a trailer from the 2022 Game Developers Conference where Unity showed off their latest and greatest advances on these fronts. The face you are looking at is a fully digital real-time character running in Unity:
Make Human
Make Human is not at all pretty like the above character tools. It even has some more-than-dubious notions ideas about race, gender, and body-types. All that said, it is open-source, so maybe-kinda-sorta the community can make it less cringey ¯\_(ツ)_/¯? Anyway it works with the same principle of moving sliders as Character Creator in order to adjust the body shape and height of your characters. These characters come fully rigged, and can be imported with little fanfare directly into Unity, and animated by whatever means you want.
Blender
The most difficult solution, but also the most powerful, is to learn how to make a human from scratch using more traditional 3D modelling software such as Maya, C4D, or Blender. There are many many many tutorials out there for modelling characters, “rigging” them into controllable marionettes, and then importing them into Unity. We will not go through these solutions for this tutorial.
For example, here is a free, 9-part tutorial on creating a humanoid character in Blender, rigging it with a Blender tool called Rigify and then importing it into Unity:
One of the advantages of learning the entire modelling > rigging > animating > game engine workflow is that you can design non-standard characters without falling into the clichés of most cookie-cutter-make-me-a-human tools. Once you have learned the basics of Blender’s Rigify system, you can even apply it to various quadriped or flying creatures, which are by the way included by default in the basic Rigify installation.
Open Source Afro Hair Library
While you are designing your own 3D character, might I interest you in rethinking your baseline assumptions on what makes for a standard playable character? How about checking out the OSAHL by pretty darke & Cie. :
“The Open Source Afro Hair Library is a queer, feminist, pro-black resource for 3D models of Black hair textures and styles.”
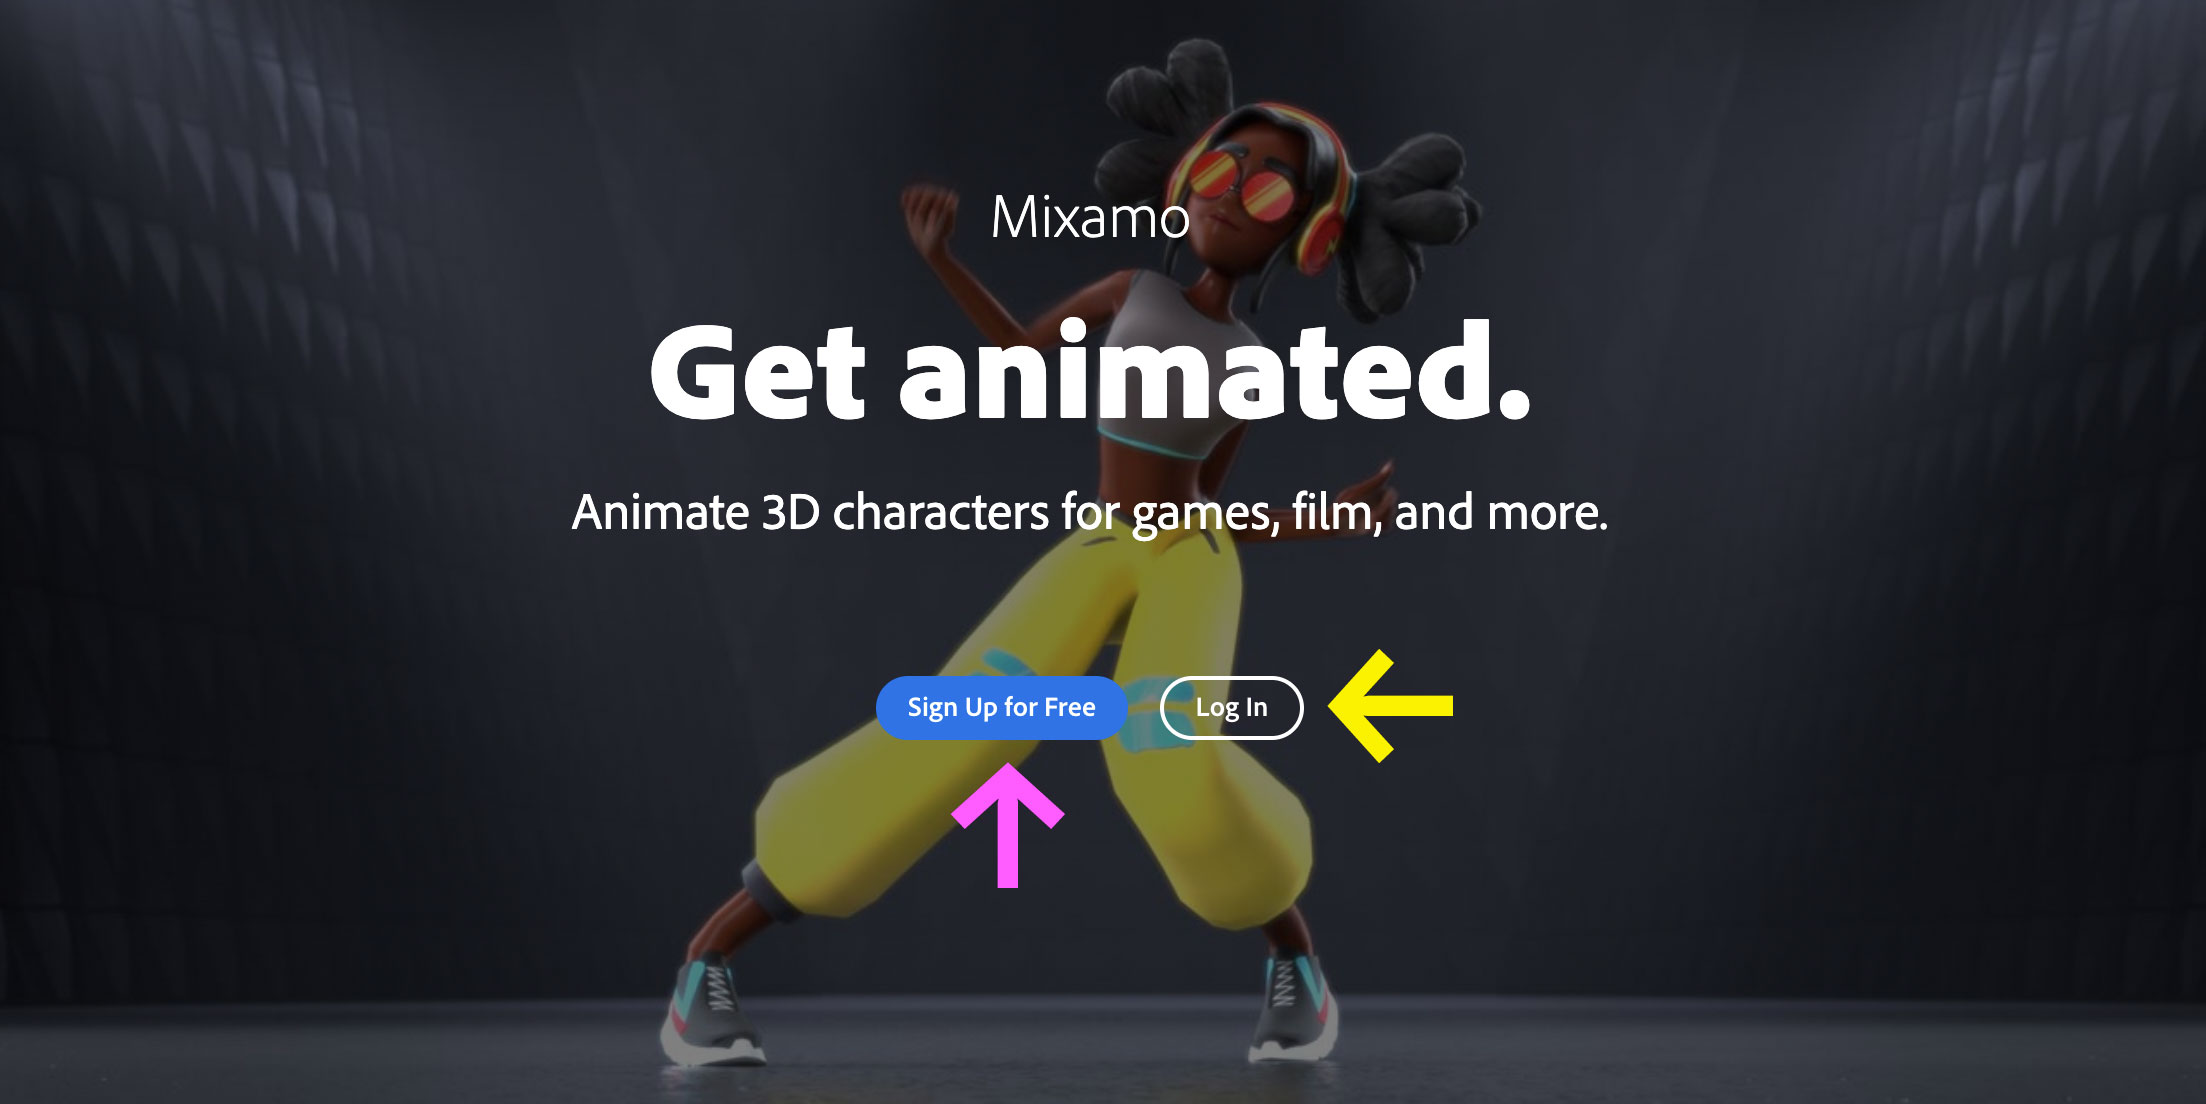
Mixamo
For this tutorial, we are going to use an older humanoid rigging and animation tool named Mixamo. It is a very easy to use tool and allows us to quickly have a humanoid character moving inside of our game or virtual reality experience.
Unfortunately this tool has suffered the opposite trajectory as Ziva Dynamics and MetaHuman. Mixamo is yet another one of those amazing tools that was bought by Adobe, who subsequently abandoned it in development limbo where it just sits there, eternally withering away. For now, it is still (somewhat) usable — albeit only via the Chrome browser. Since it has not evolved in years, it is probably just a matter of time before Adobe pulls the plug. Adobe just doesn’t seem to get (or care about) 3D, despite the fact that it keeps buying significant 3D tools, such as Substance. Anyway, Abobe. Sigh. Double sigh.
Despite all that, and since we are still waiting for a complete humanoid solution from Unity (post-Ziva/Weta acquisition), we will have to use Mixamo for now.
Mixamo is actually two things: an auto-rigging tool and a library of animated movements (idle, walking, jumping, dancing, etc). The original idea of Mixamo was to use AI in order to “auto-rig” 3D characters, thereby removing one of the most tedious steps in transforming a humanoid shape into a character that we can animate in a game or interactive story. Most people use the library aspect, as will we in this tutorial. But the auto-rigging tool is the magic part, and merits mention. This auto-rigging feature allows you to:
- Create a 3D shape in whatever tool you want. This 3D shape (or
mesh) has to vaguely ressemble a humanoid with arms, legs, a torso, a head, and be positioned in a “T-Pose” with their arms spread out on each side, away from the torso - Upload this character to Mixamo
- After about a minute it will have generated a fully animated 3D rigged marionnette that you can download
- You can import and control this character in Unity or Unreal
Today, most people just use Mixamo as a free downloadable library of characters and animations, without realizing that it can also be used to “auto-rig” your own hand-made characters. There is even a Mixamo Blender plug-in tool that allows you to auto-rig your Blender models using the Mixamo system directly from within the software, but this is outside the scope of our tutorial (cf. Mixamo addon for Blender).
Chrome Browser
We will use Mixamo entirely through their website. For now, the only browser that seems to work with it is Google Chrome. Yes yes, we know: Chrome is a beast that will suck your battery dry. Nevertheless, you probably will have to use Chrome.
Login
If you already have an Adobe account, Log InSign Up
Character
There are two main sections in the Mixamo website: CharacterschooseuploadAnimations
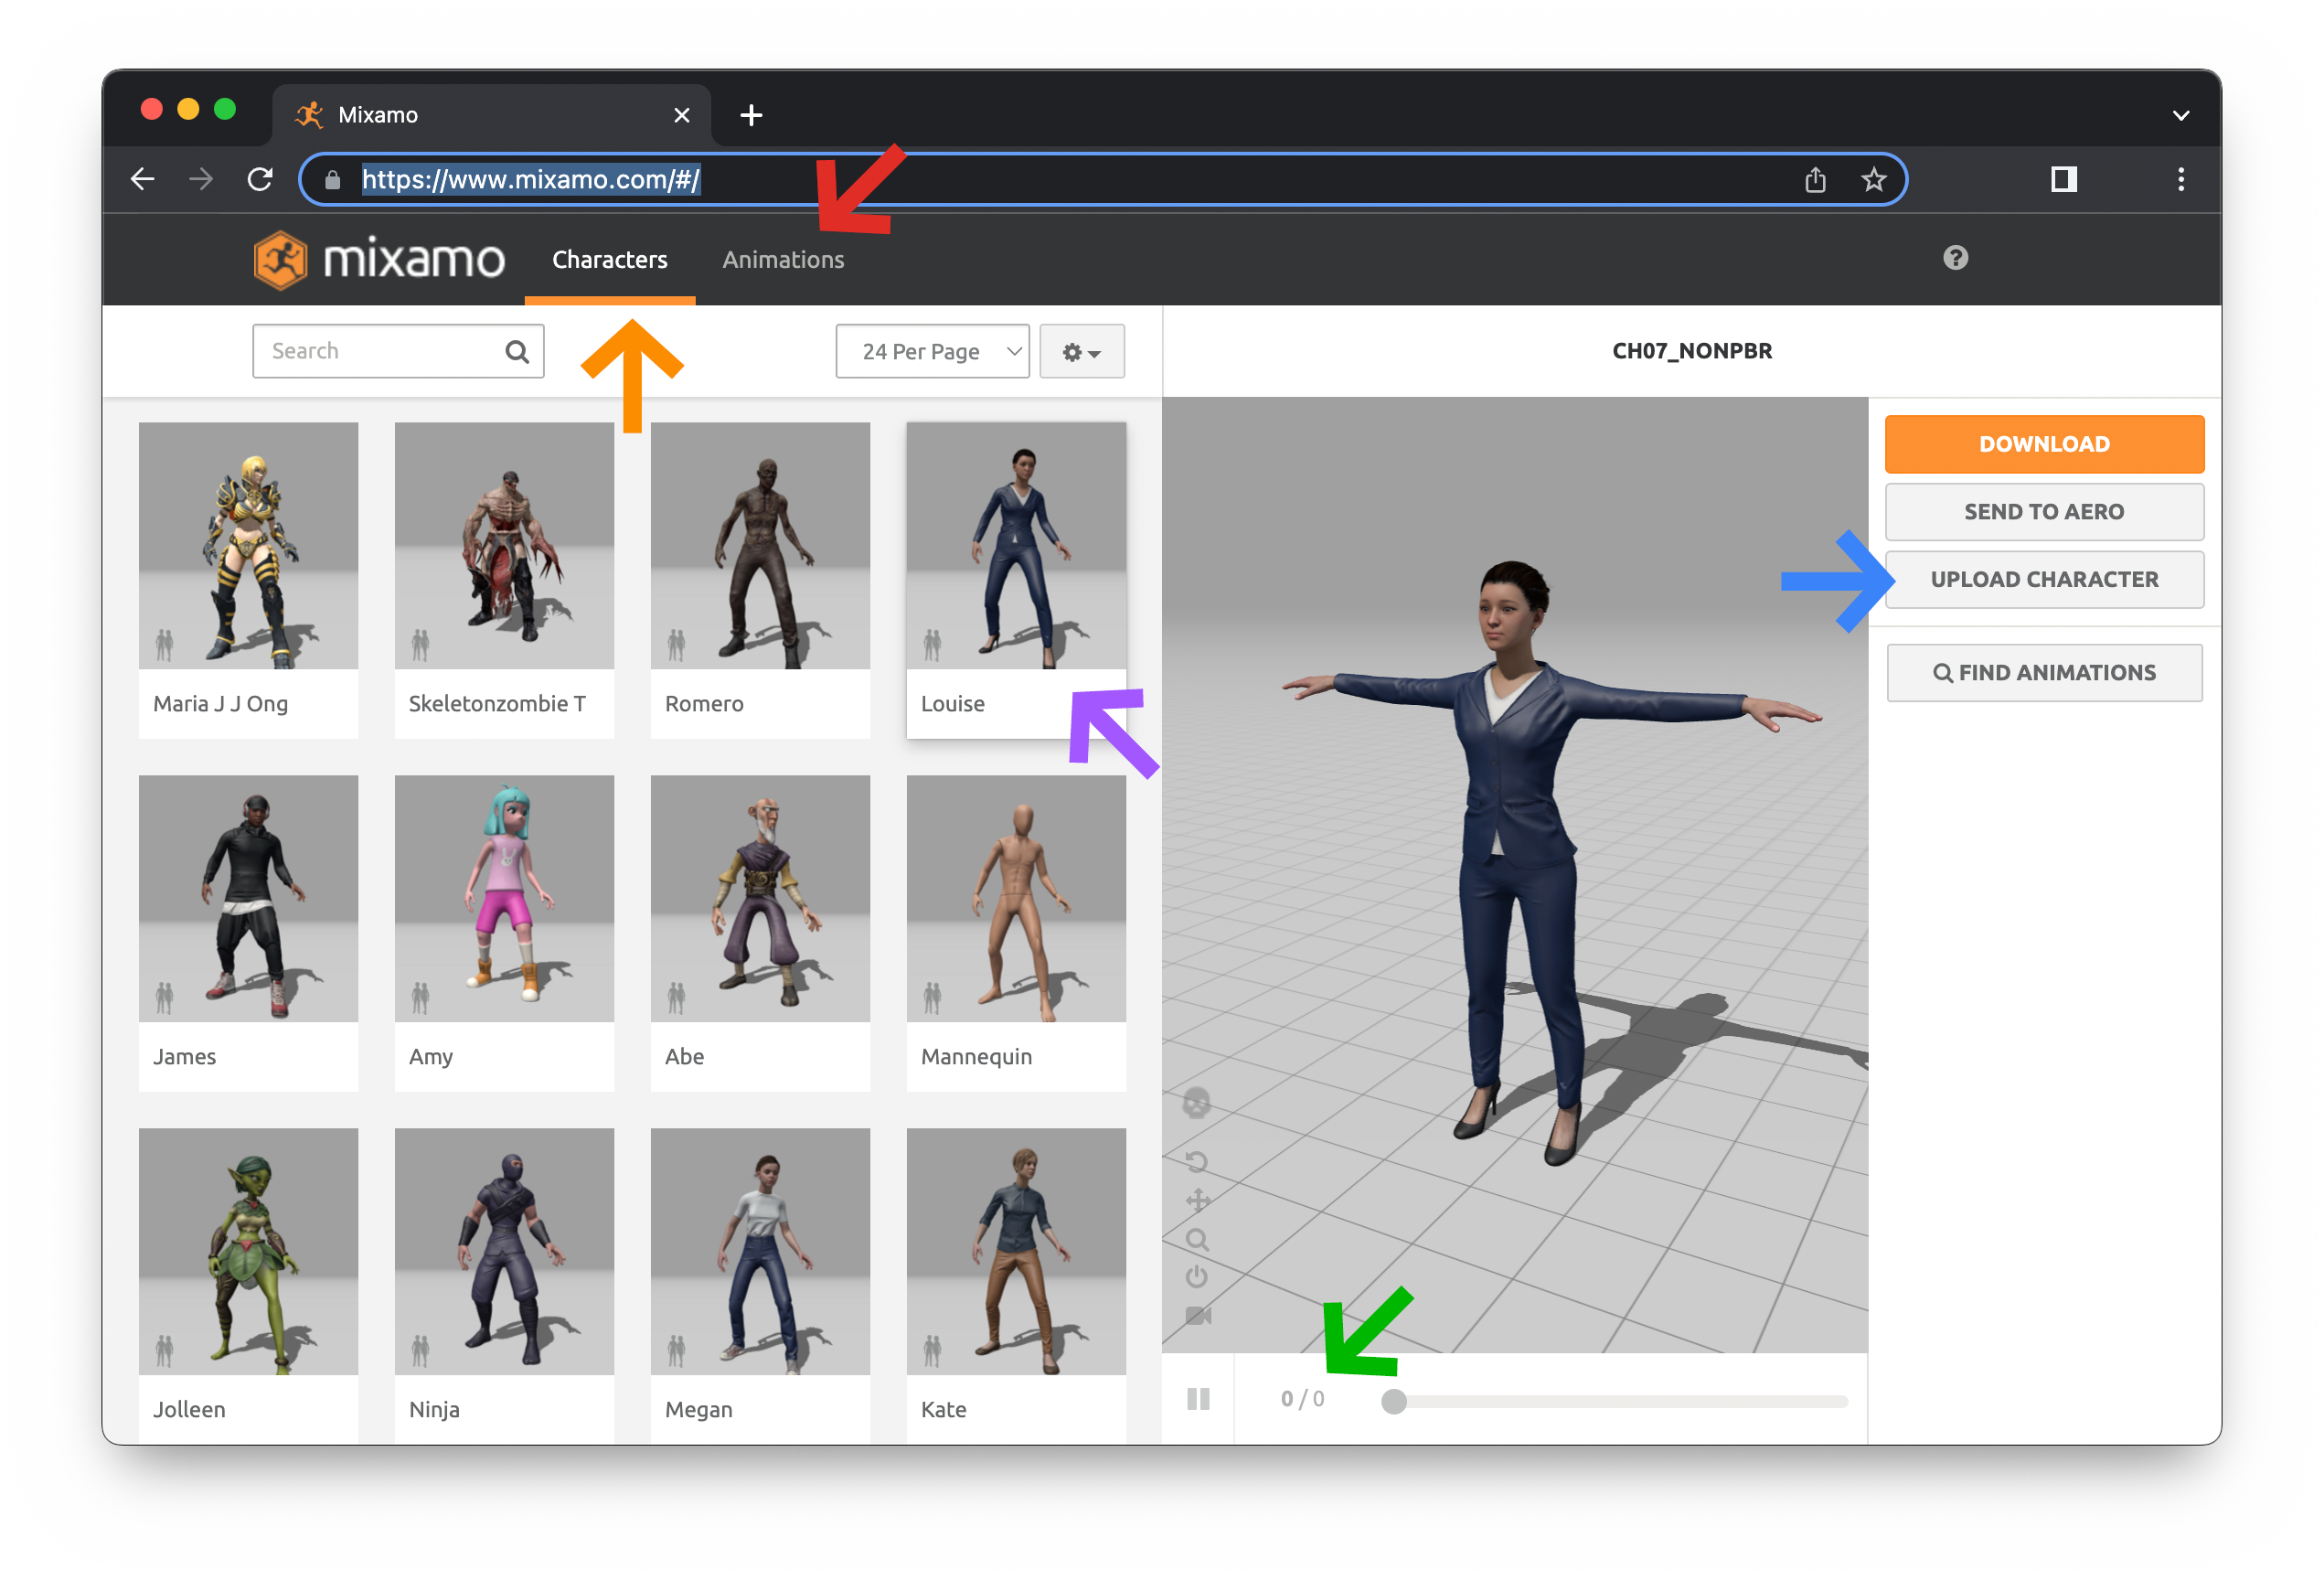
Meet Louise
For now, Louise isn’t animated. As you can see at the bottom of this window, there are currently 0/0T-Pose, which is a 3D animation default position that shows clearly (especially to the computer) what parts of the body are attached to what. By moving the arms far away from the torso, there is less risk in the computer confusing the parts of the 3D mesh belonging to the arms and the parts belonging to the body.
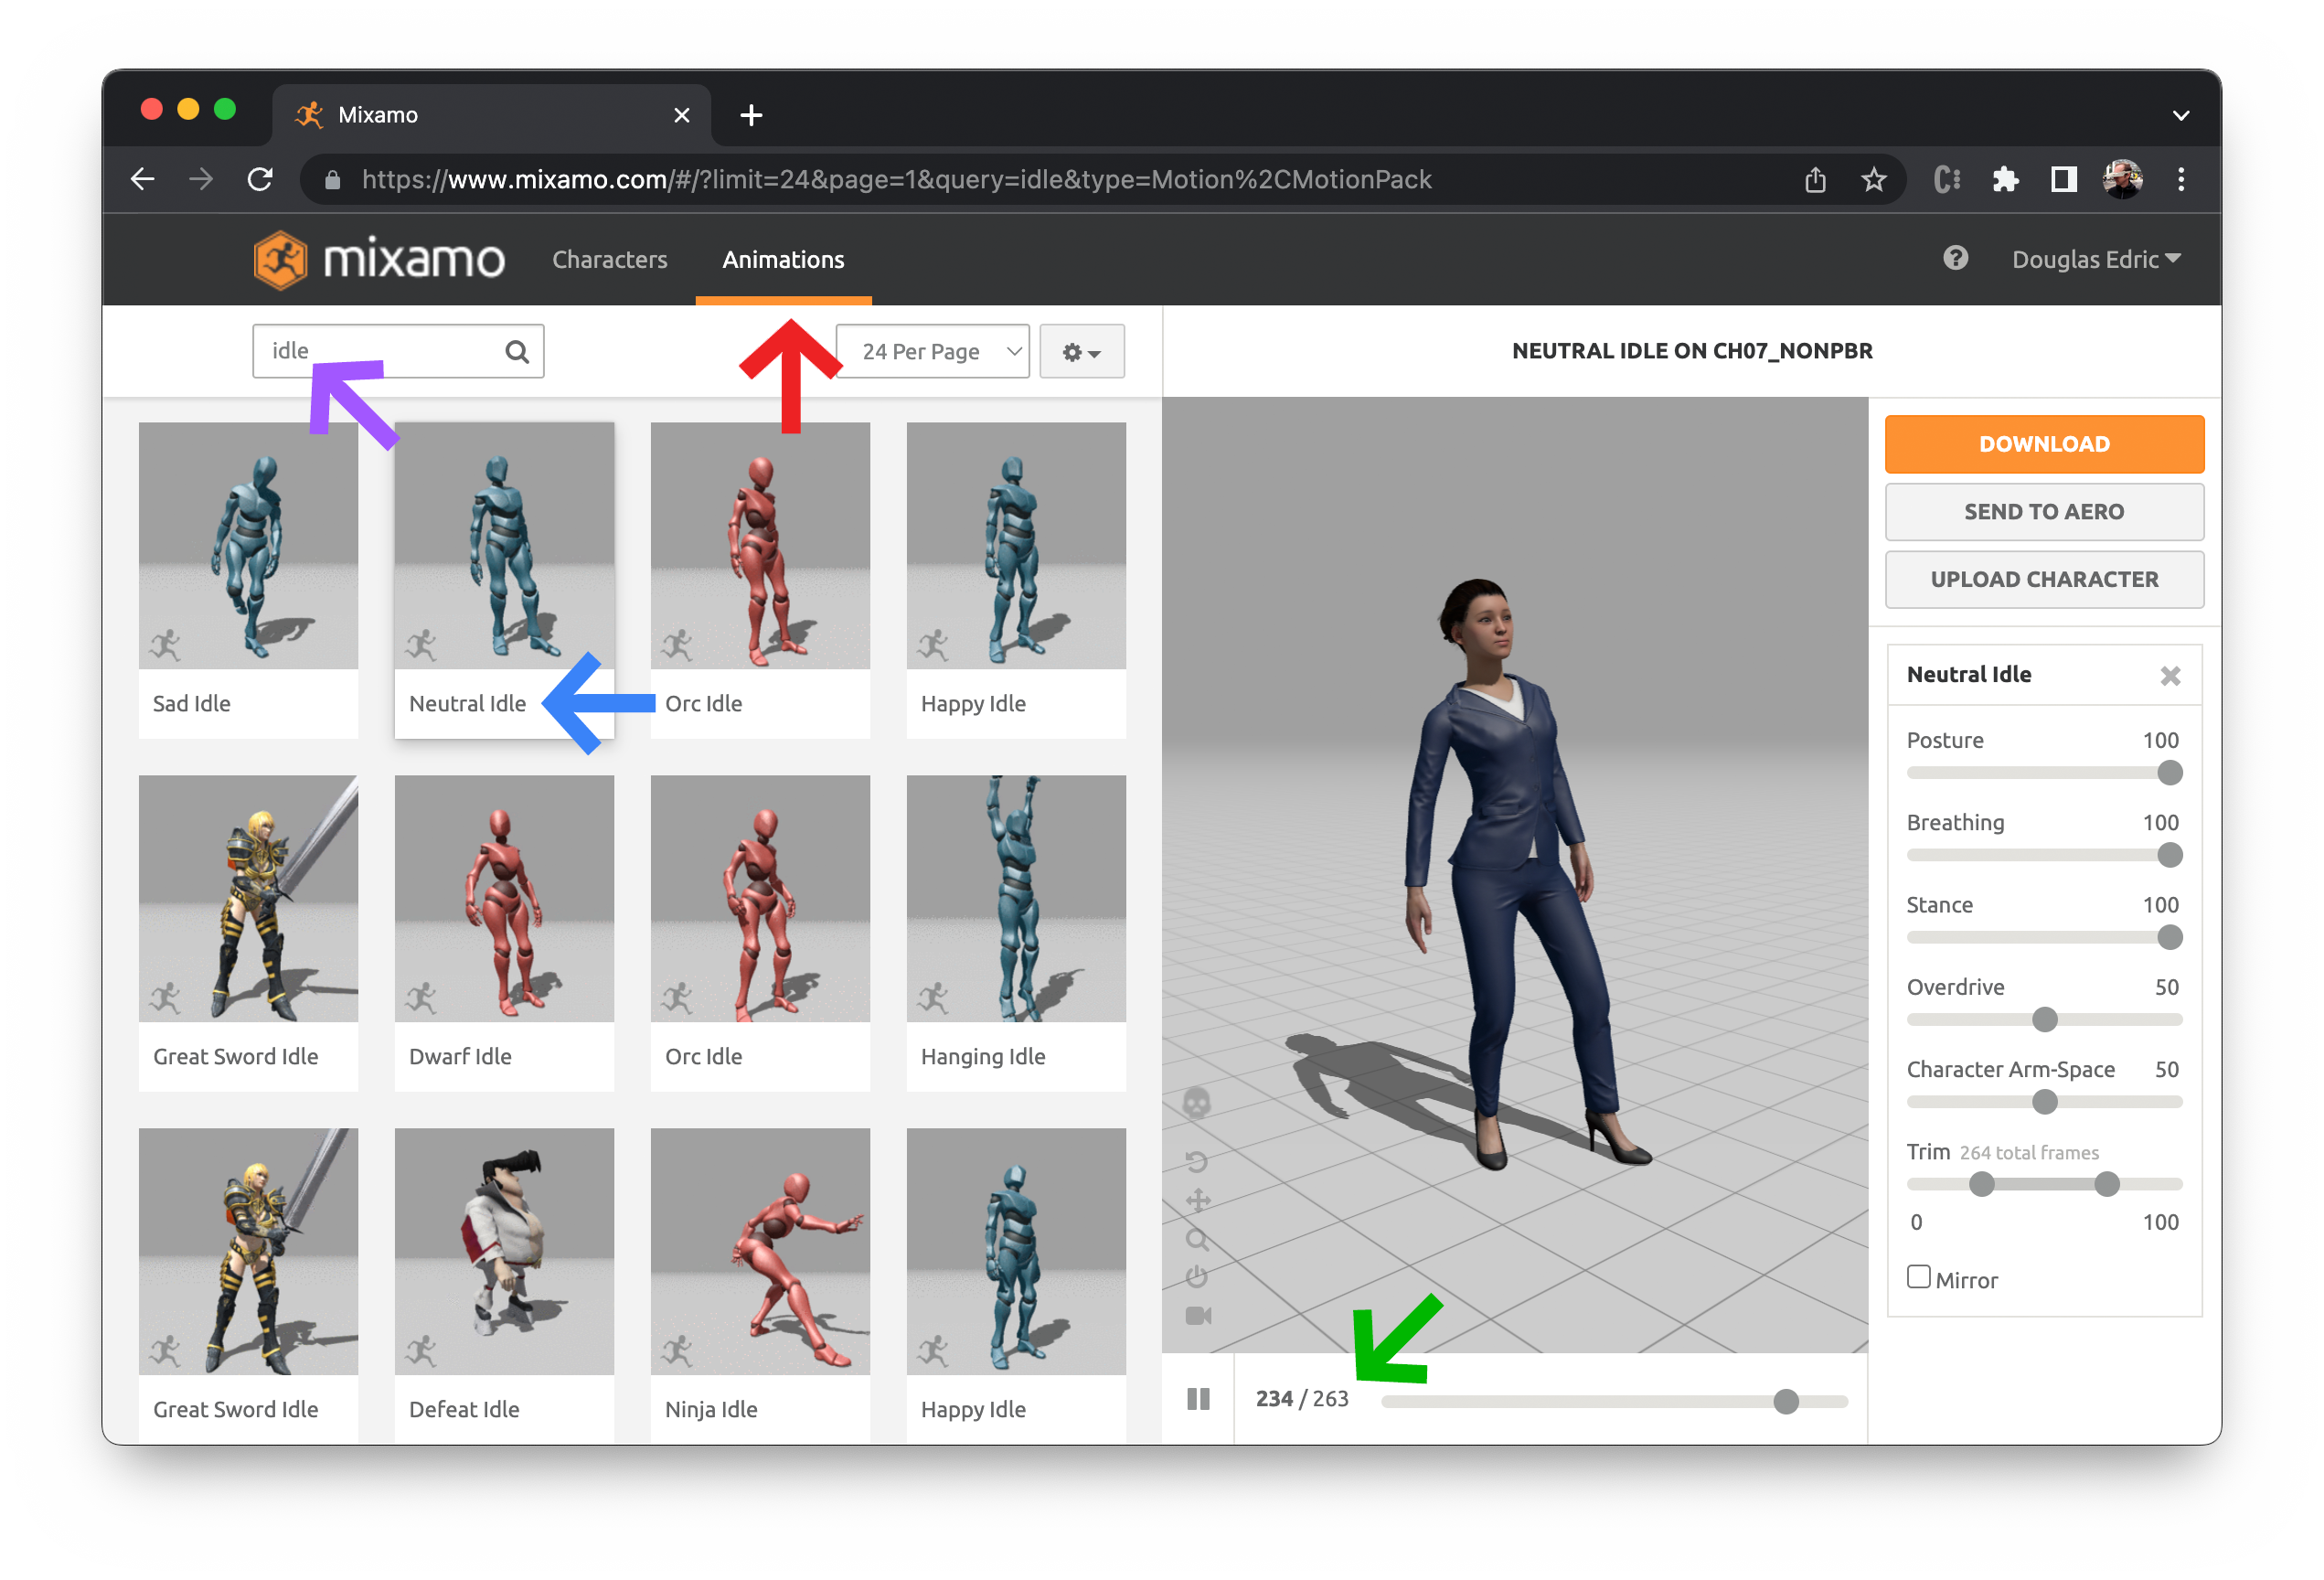
Animation
Now that you’ve chosen your character, press the Animationsidleselected your animationframes
♫ The Knee bone is connected to the thigh bone ♫
If you want to better understand how these 3d humanoid animations work, select the skeleton viewrig” that deforms the 3D mesh, much the same way bones (and muscles) control the shape of our body. This rudimentary image will also help you to understand how animations will work later inside of the Unity “Mecanim” animator system: this concept of a “rig” of “bones” is what allows an animated character to transition seamlessly from one pose or movement to another, as well as adapt (within limits) to different body lengths and heights. You should now see your animated bones without any skin, which technically means without any 3D meshes, textures, or materials.

These bones are the actual positions of a real human moving in physical space, recorded by a motion capture system over time, frame by frame, and now playing back in Mixamo. This recording from a motion capture system is nothing else than a record of the x/y/z positions and rotations of these bones over time. These animations do not even need to record any physical attributes other than these x/y/z positions and rotations. The final 3D animation will require injecting these invisible bones into a character’s 3D mesh and allowing these bones to move the vertices of the model as if it were pliable skin on a human body.
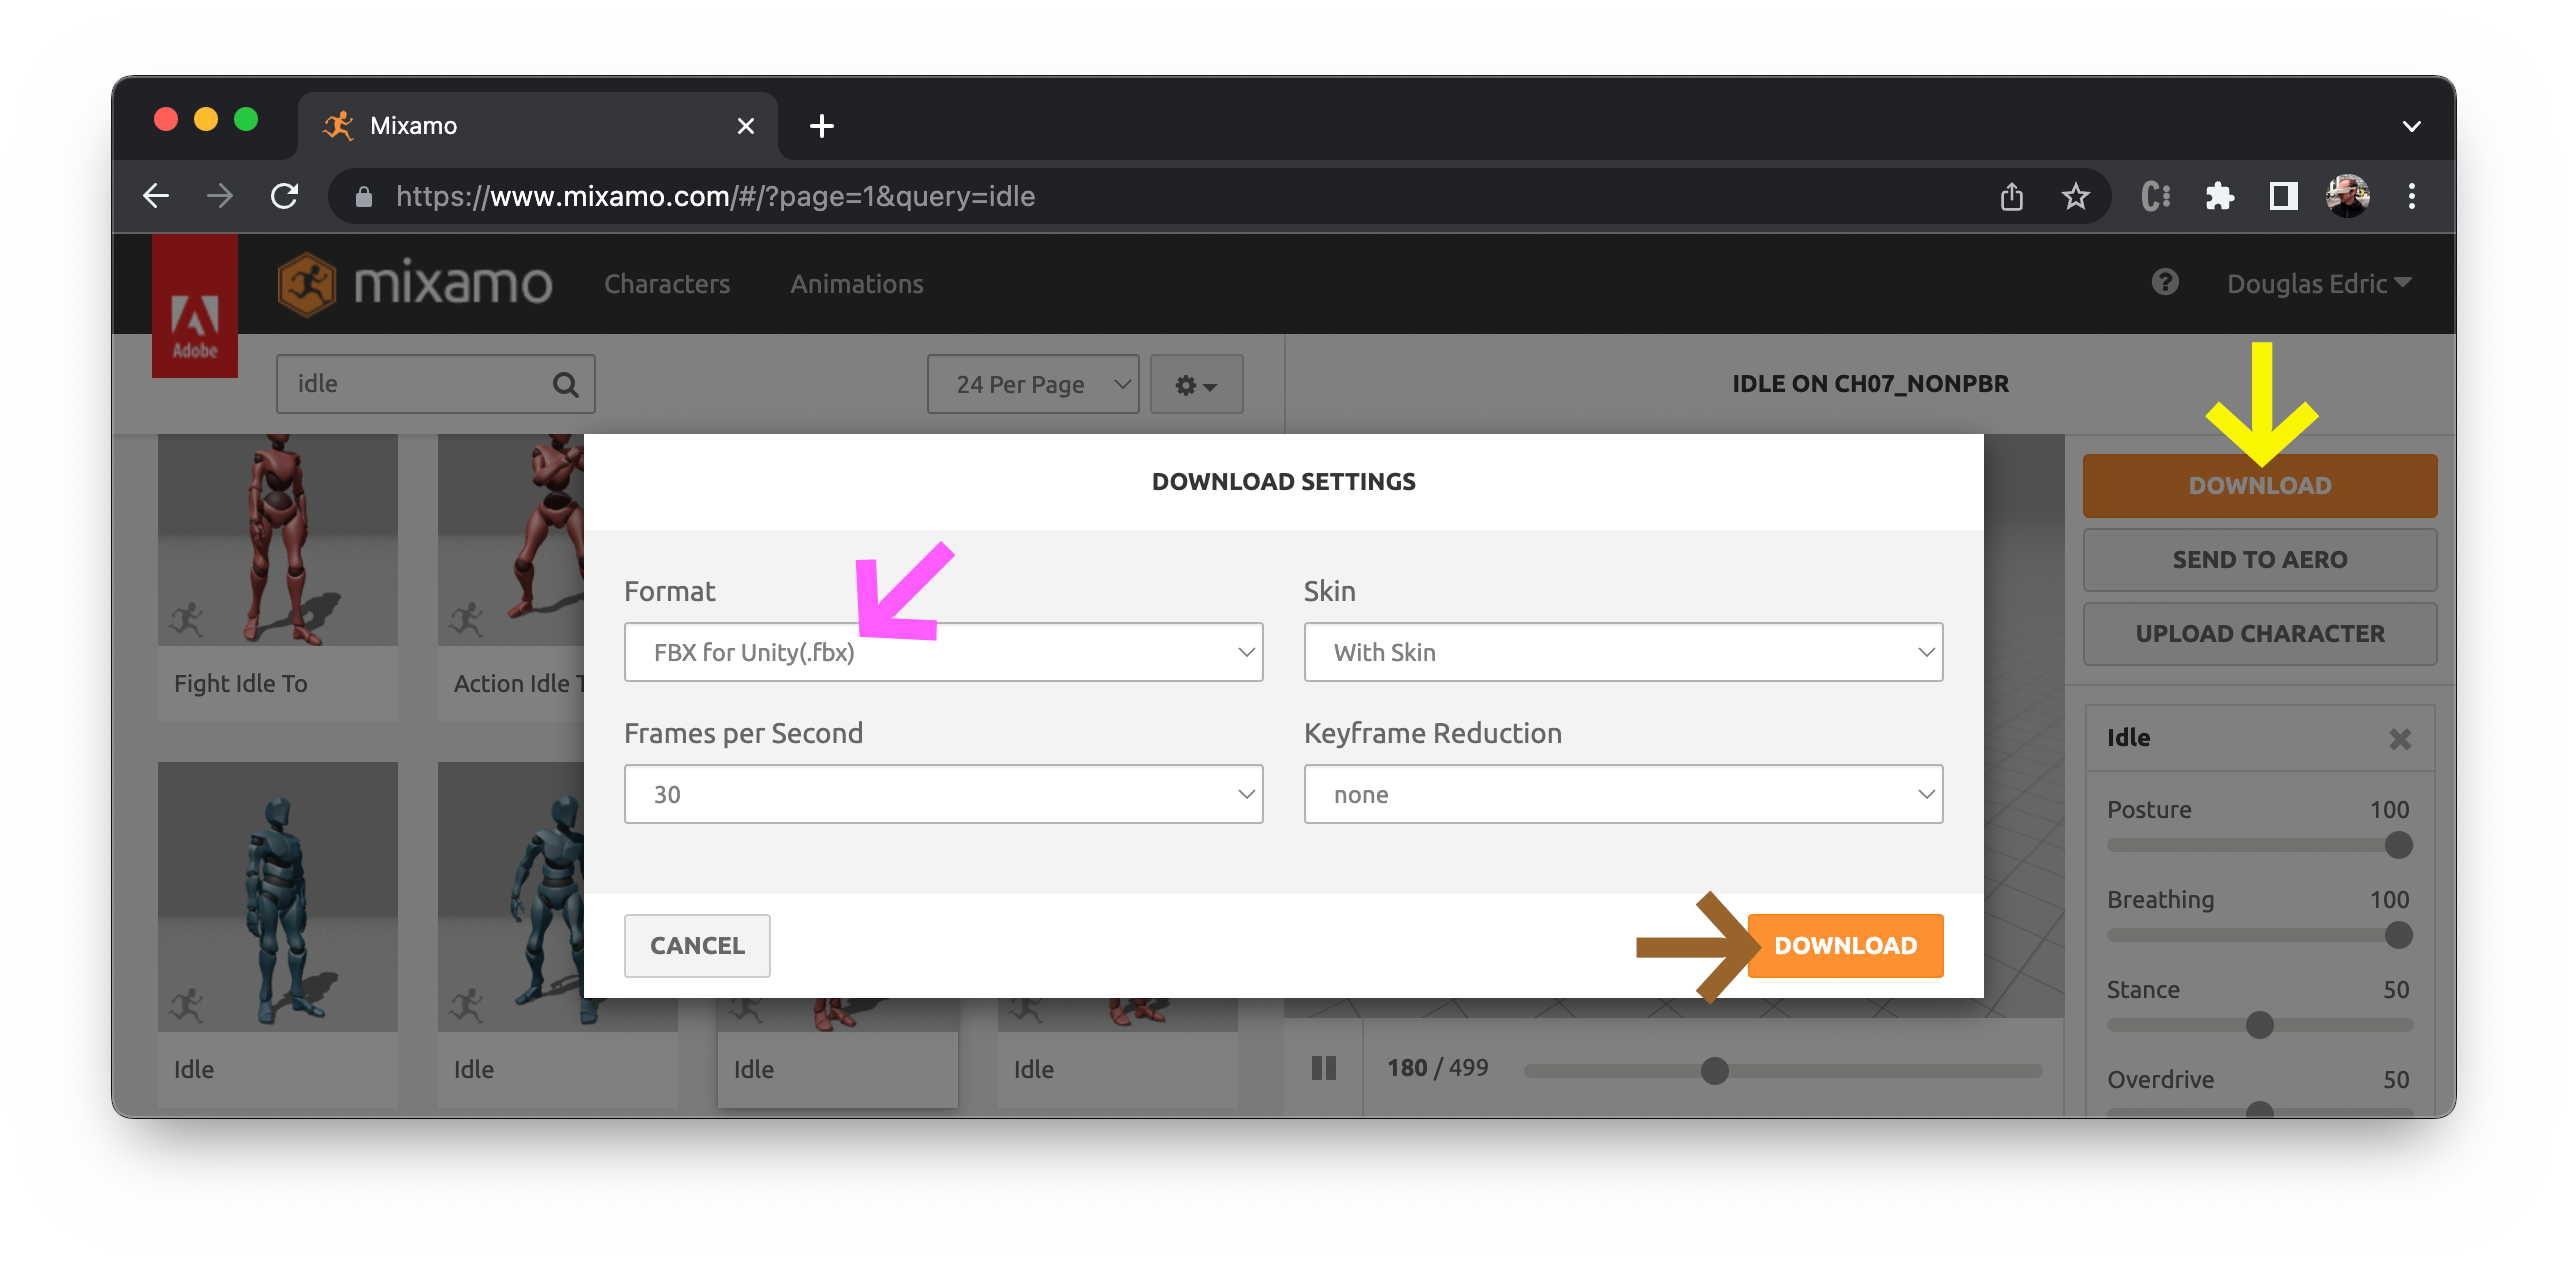
Download
Once we have applied an animationcharacterdownloadFBX for Unitywith skin, 30 frames per second, no keyframe reduction), and then download
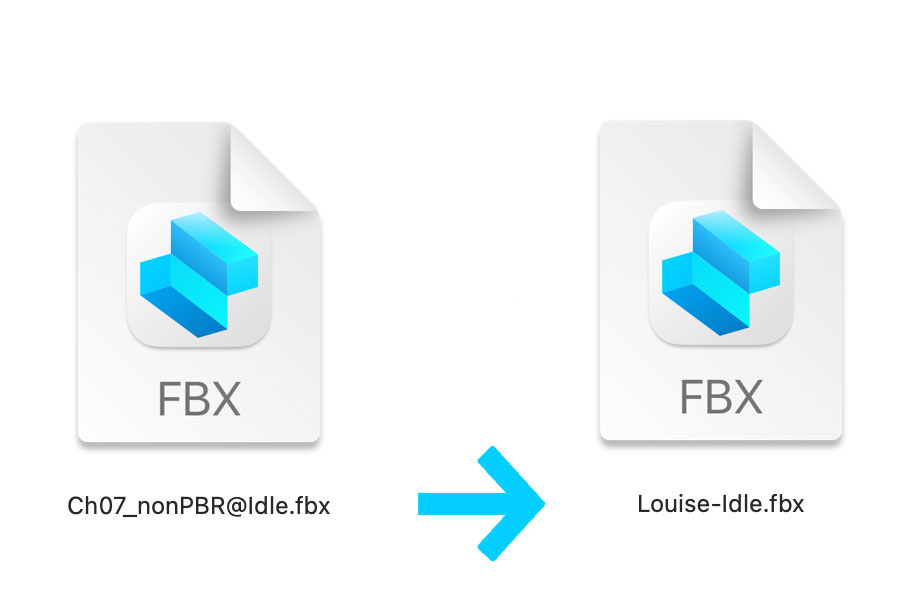
This downloaded FBX-format file will usually come with a fairly unreadable name. In my case, she was named Ch07_nonPBR@Idle.fbxLouise-Idle.fbx
Import
There are many ways to import a file into Unity. The easiest is probably to just drag the .fbx file into your ProjectAssets folder.
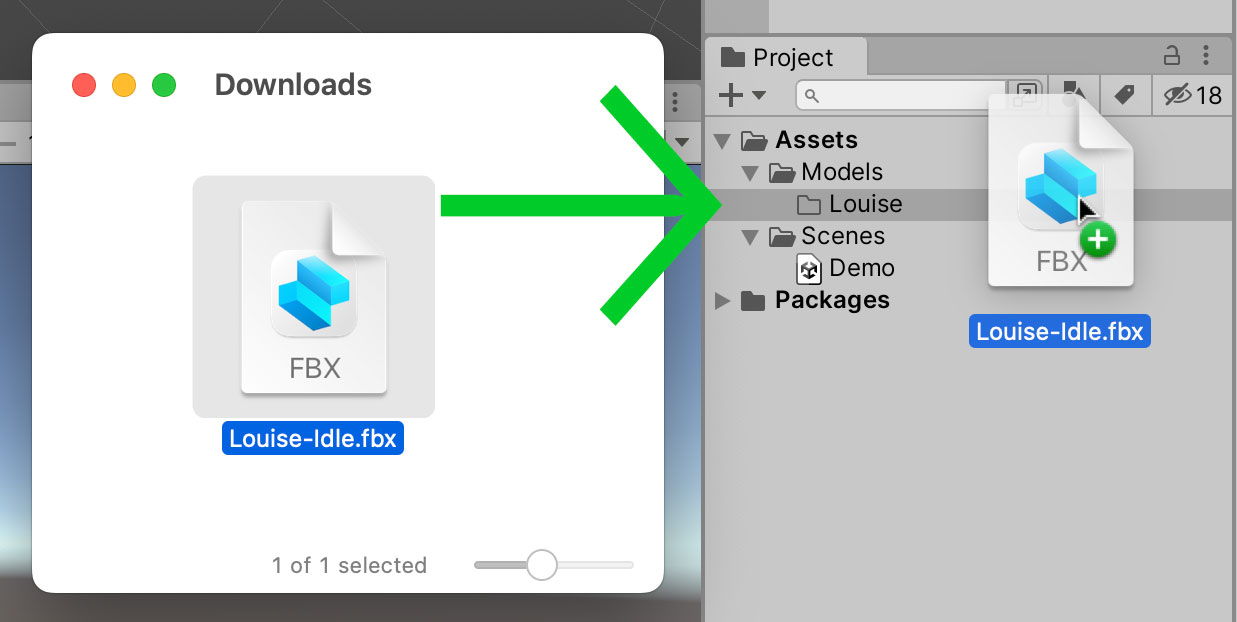
Make sure your Assets folder is well organised, with clear names: projects in Unity can quickly get out of control — keep your names simple. Here I have created a folder named Models (capital M, plural s), and inside that folder is a sub-folder named Louise that will contain all the model information about her: materials, textures, animations, and so on.
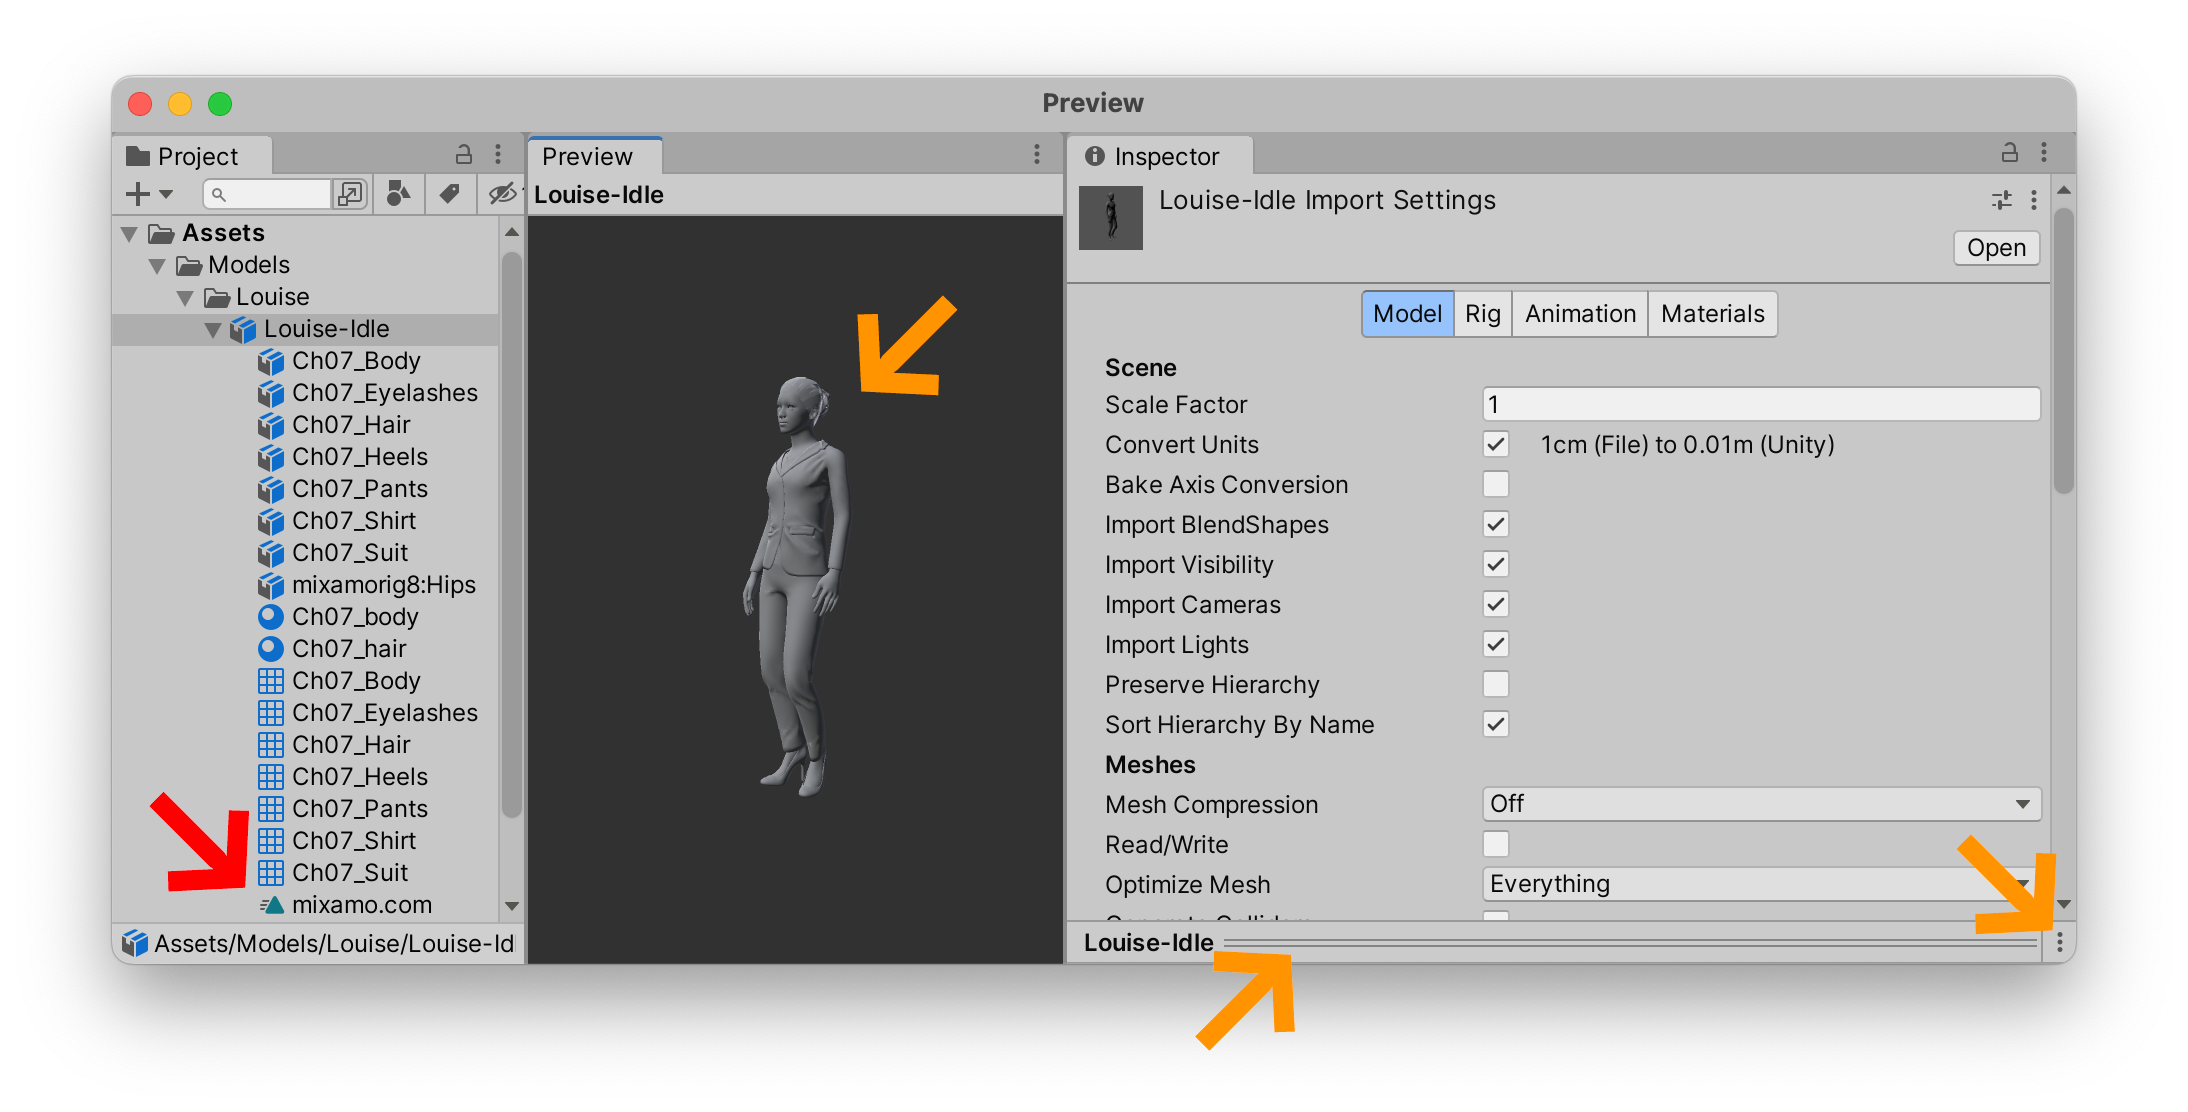
If you select your imported model and look at its Inspector, you will see that LouiseIdle animation a better name than its current default name mixamo.comPreview, try clicking on the horizontal grey linesthree dotsInspector and choose Convert to Floating Window.
Model Settings
As you can see below, there are a lot of possible settings for a model, which can seem scary at first. Note that there are four tabs: ModelRigAnimationMaterials
Modeldeals with the 3D mesh (it’s shape) and various settings related to the mesh (quality, compression, scale, etc)Rigallows you to import or create a skeleton rig that will move the 3D meshAnimationis the keypoint animation of the skeleton rig. You can rename, fine-tune, and select the time codes of the various animations of the characterMaterialsare the appearance of the character: the colors, textures, and shaders that define the appearance of the skin/clothing of the character
Over time you will eventually see that each section breaks down neatly into specific aspects of these four concepts. All four are essential to how 3D characters work in Unity. Given the number of parameters, we will only select the absolute essentials here, in order to keep the scary button worries (“what are all these buttons for!?”) to a minimum.
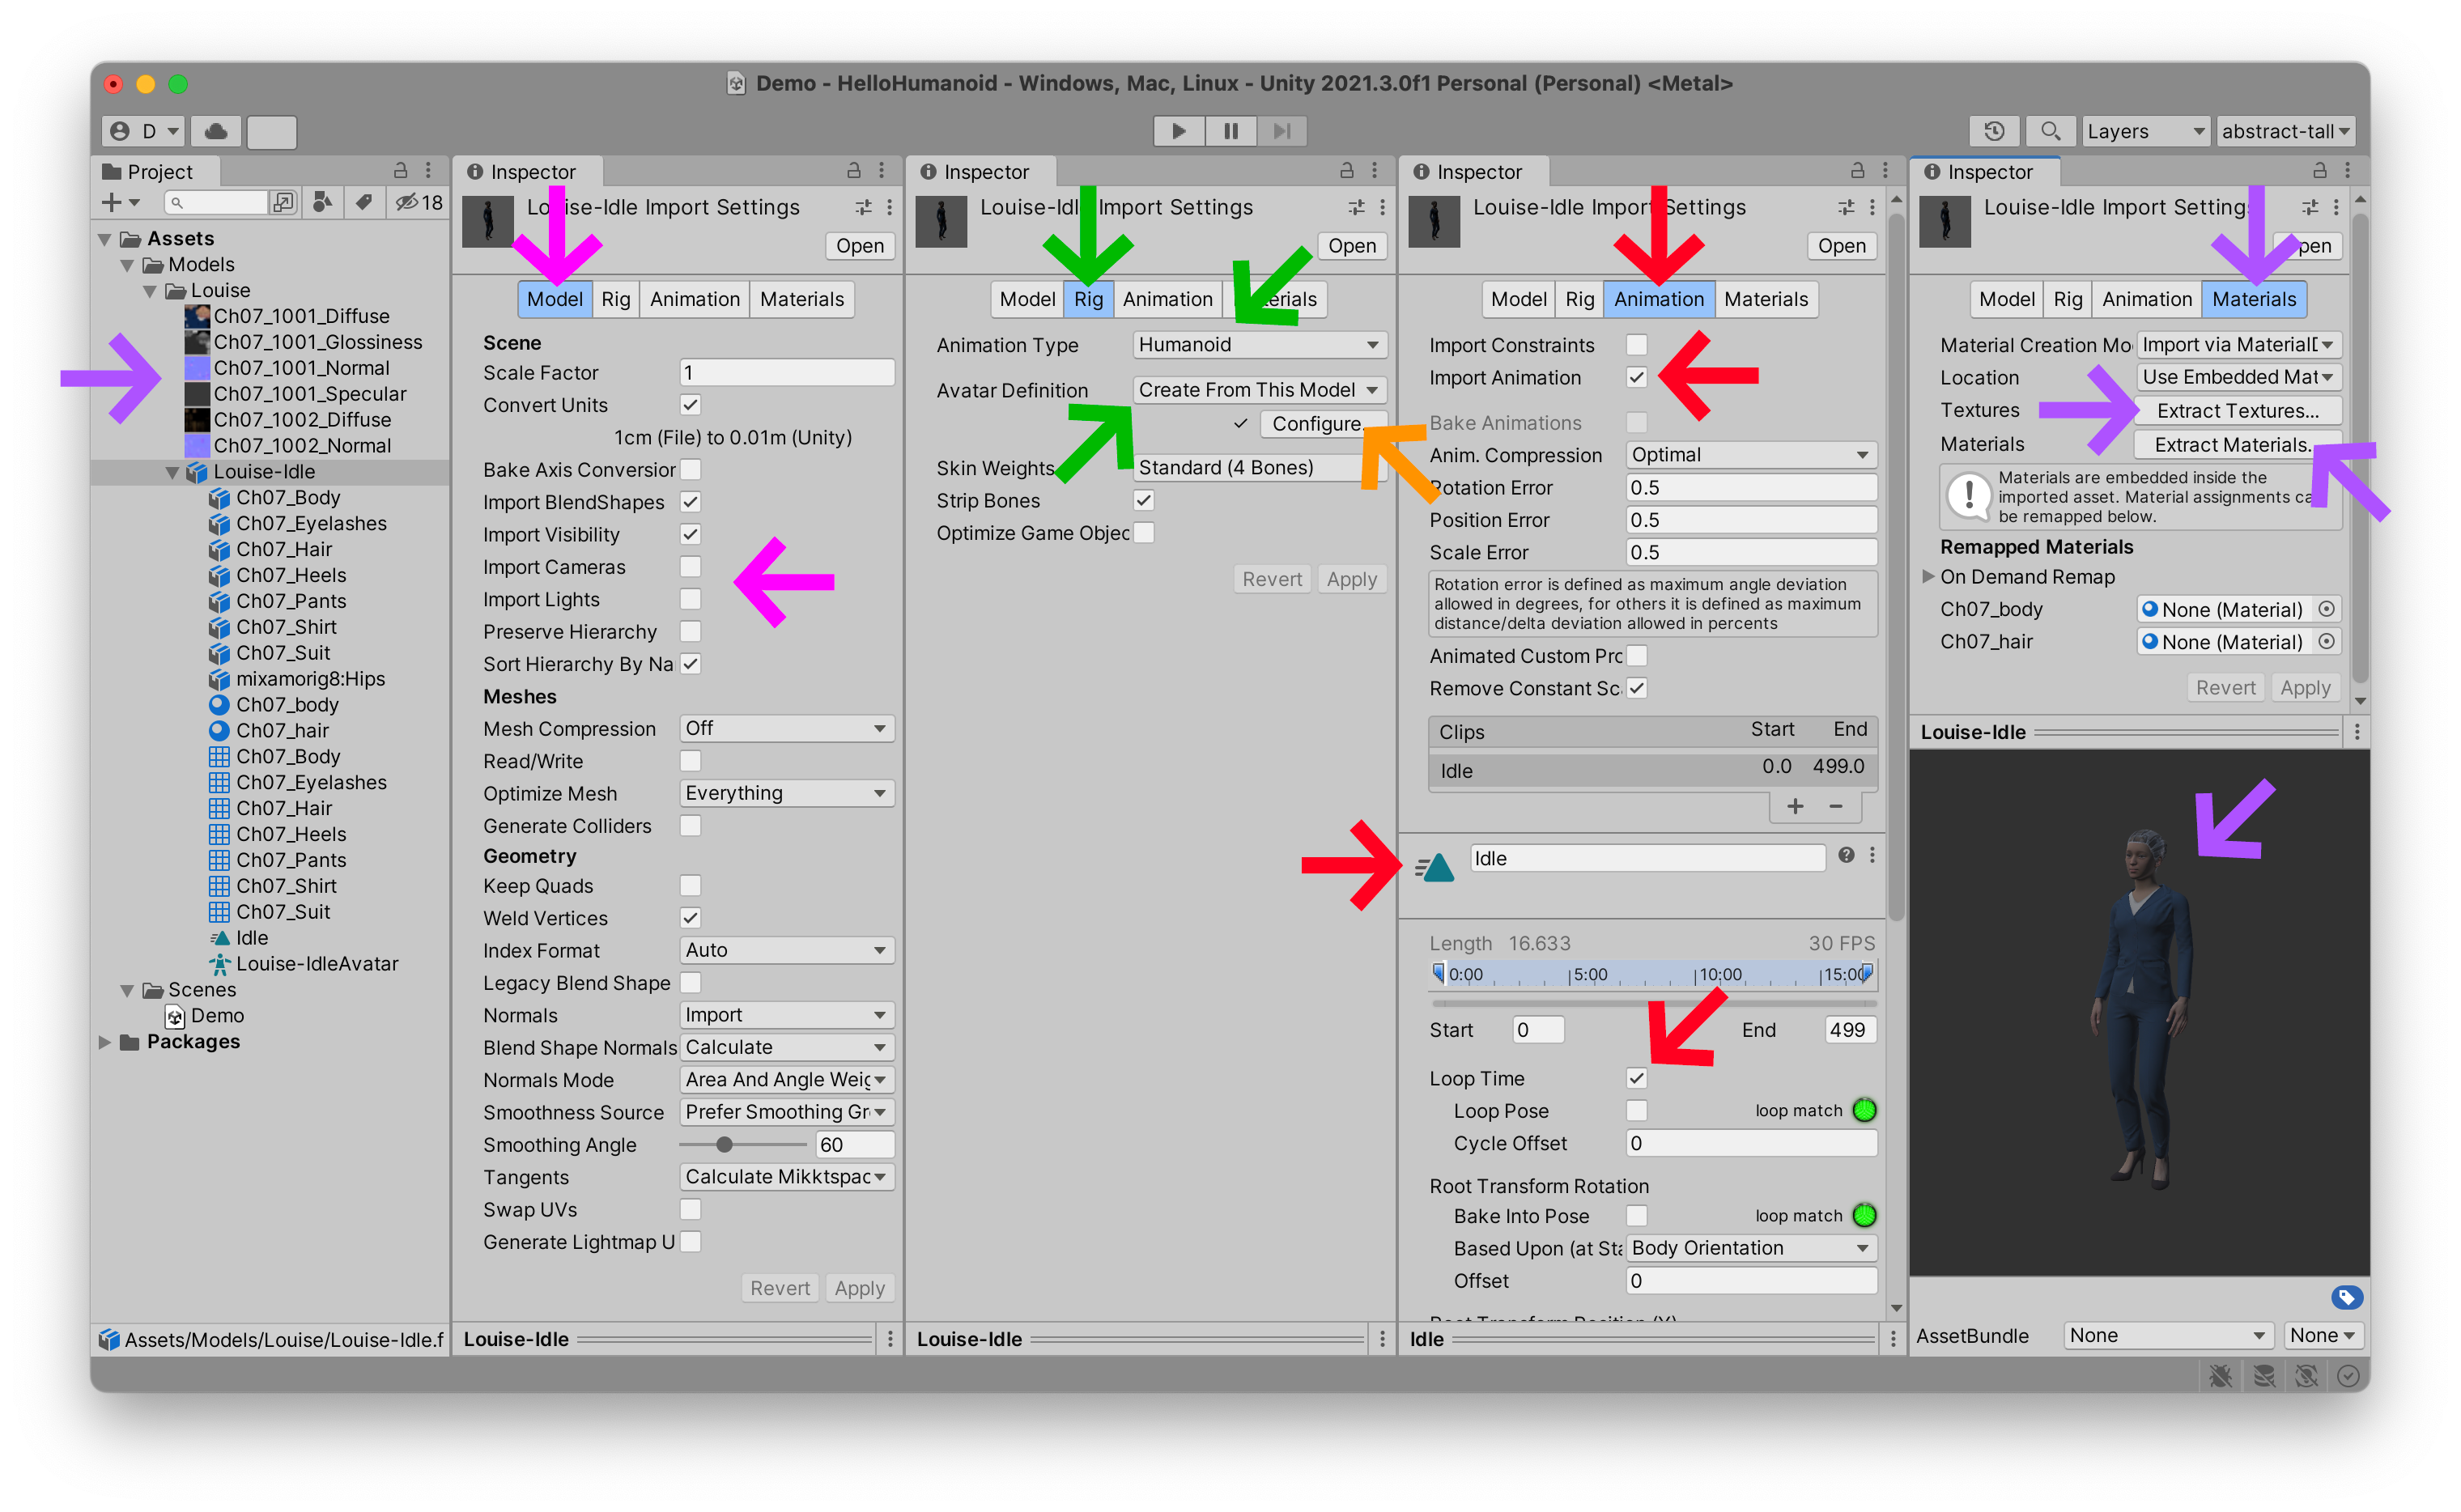
Inside the ModelCamerasLightsApply button at the bottom of this window.
Inside the RigHumanoidCreate From This ModelApply your changes when you are done.
Inside the AnimationImport AnimationIdleLoop TimeApply button you need to press to validate all these changes.
Finally, let’s give Louise her colors and materials back. Select the MaterialsExtract TexturesProject’s Assets folder, I have selected the LouiseExtract Materials.fbx file. You can also extract them into a special Materials folder, but we won’t cover that right now. To keep it simple, just extract your textures and materials into the same folder as your model. Be sure to Apply these changes and you should now see Louise with her skin color and clothing color back to their normal appearance.
Avatar Configuration
If you want to play around with the AvatarRigConfigureAvatar ConfigurationT-Pose. Try playing around with the Muscles & Settings options to see how well your avatar reacts to its rig. Once you are done configuring your avatar, you can return to the previous RigDoneInspector.
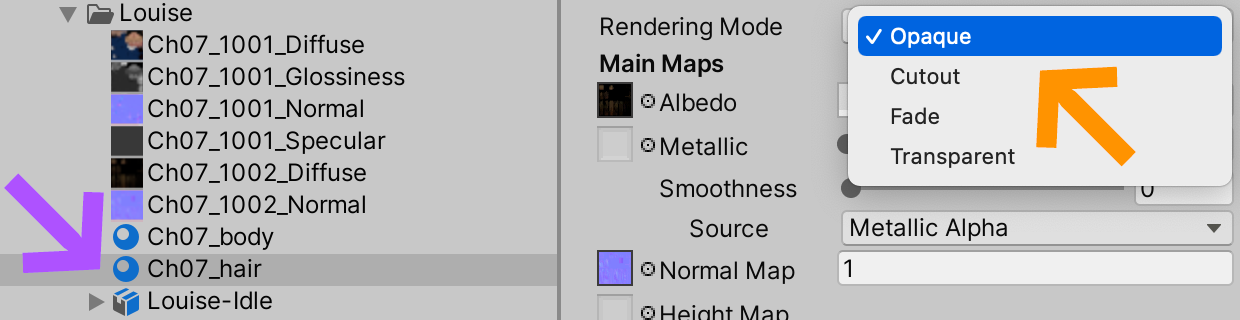
Opaque Textures
One problem with Mixamo materials is that they come poorly configured into Unity with flipped normals, meaning that our characters look like weird inverted skin monsters. For my Louise imported model, her clothing was fine, but her hair was oddly configured. A simple fix for this problem is to select our extracted Ch07_hairRendering Mode to Opaque
Game Object
Now that we have configured our model correctly, and fixed the weird material bug, we can drag Louise into our Heirarchy180°Y axis so that she’s facing the camera. I’ve also moved the camera closer to her so that we can see her better.
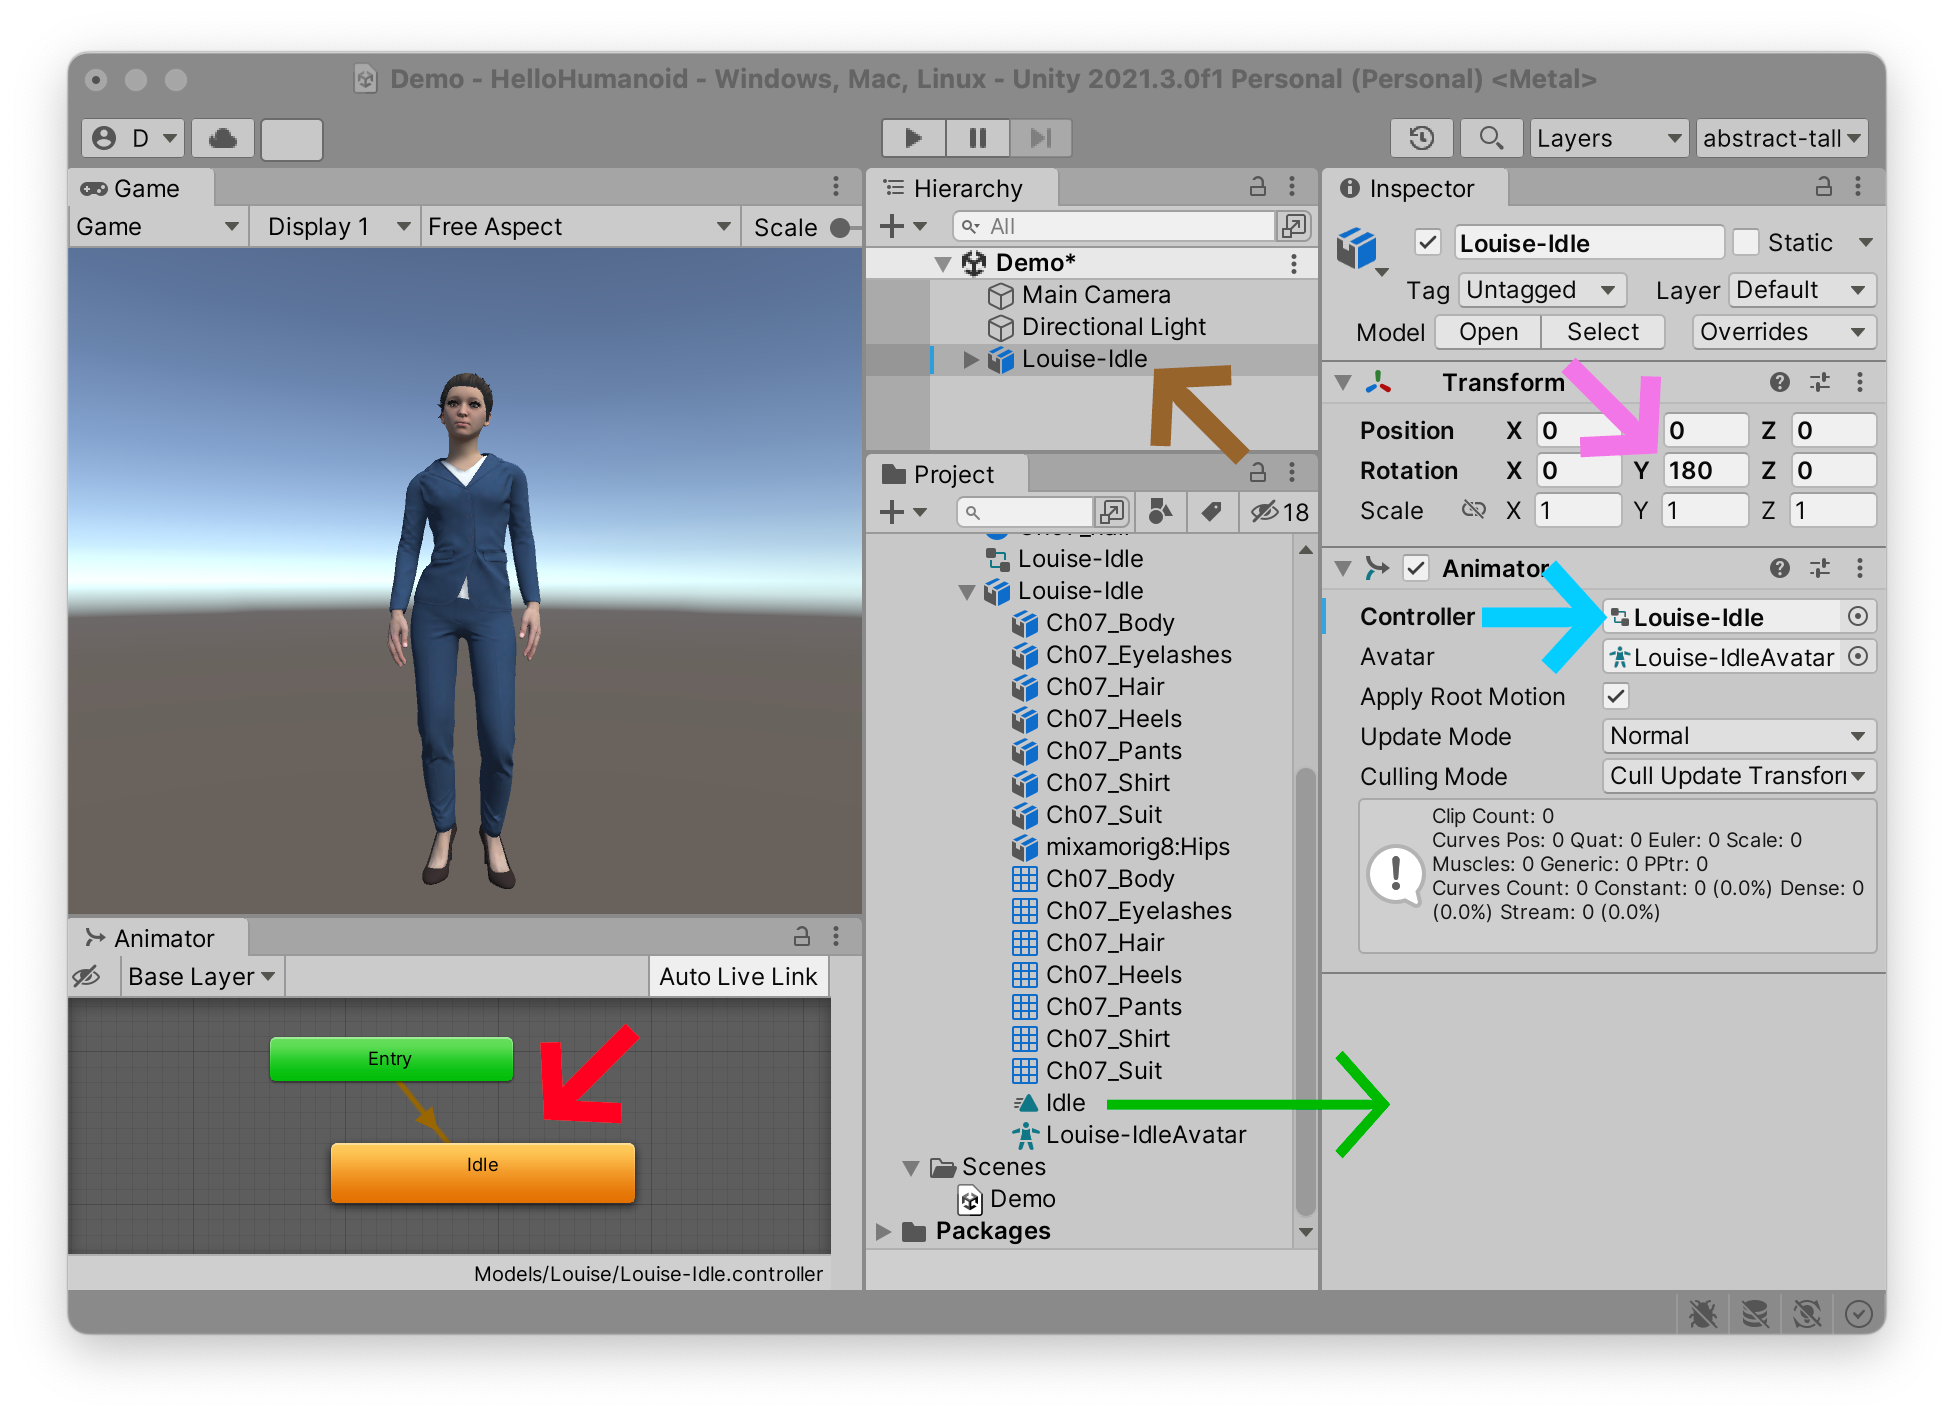
Animator
If you play your game now, you will not yet see the animation we imported with Louise. We need to drag the IdleProject window’s Assets folder, directly onto our Game ObjectScene and Heirarchy views. This will add the IdleAnimation ControllerEntry
If you now press the Play button, you should see Louise breathing via her looped Idle animation sequence.